The secret to cool paint effects rubbing alcohol
You can unlock amazing results in your acrylic art with a simple household item. Rubbing alcohol is a versatile tool for any painter. This creative technique works through a simple scientific principle.
When you apply alcohol on wet paint, its lower density repels the pigment. This action forms unique circular patterns and cells.
Additionally, a light spray of alcohol instantly pops tiny air bubbles in your pours. This ensures your finished paint surface is perfectly smooth.
Using Rubbing Alcohol with Acrylic Paint
You can master amazing effects by understanding how rubbing alcohol interacts with your paint. The process is a fascinating mix of physics and chemistry. Let's explore the science behind it and how you can control the outcome.
The Science of Repulsion and Cells
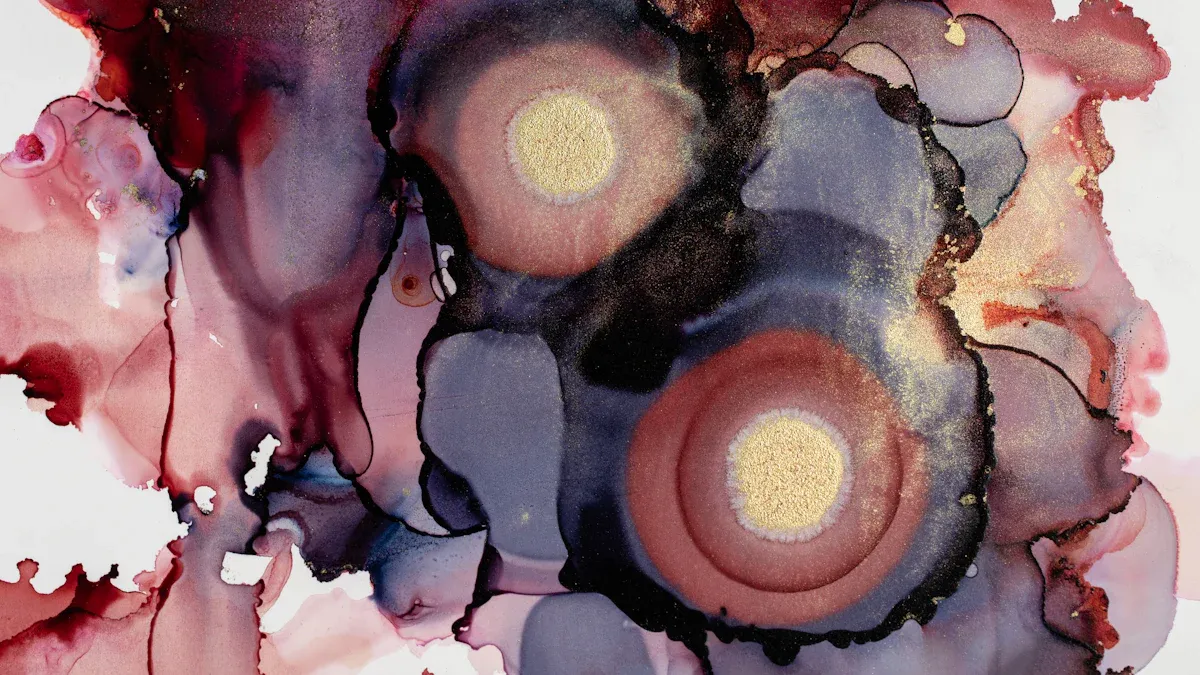
The magic you see happens because of a principle called the Marangoni effect. When you add alcohol to wet acrylic paint, you create a surface tension difference. The alcohol has a lower surface tension than the water-based paint around it. This imbalance forces the liquid to flow away from the alcohol and toward the higher-tension areas. This movement pushes the pigments apart, forming intricate cells and patterns.
This effect creates a unique kind of growth process.
- The alcohol droplet spreads rapidly across the surface.
- It creates a shear strain that makes the underlying paint layer flow more easily.
- The alcohol finds the paths of least resistance through the paint's network of polymers and pigments.
- This process results in beautiful, tree-like (dendritic) patterns.
Higher concentrations of alcohol amplify this effect, leading to broader spreading and more dramatic patterns.
Comparing 70% vs. 91% Alcohol
The percentage of isopropyl alcohol you choose directly impacts your results. Both 70% and 91% concentrations are useful, but they create different effects. Your choice depends on the look you want to achieve.
91% Isopropyl Alcohol has less water and evaporates very quickly. This rapid evaporation creates smaller, tighter, and more numerous cells. It is excellent for creating fine, lacy details. However, its fast drying time can be a drawback for some techniques.
One artist noted, '91% dries too fast.' This highlights how its quick evaporation can limit your working time.
70% Isopropyl Alcohol contains more water. This higher water content slows down the evaporation process. The slower reaction time gives the paint more time to move, resulting in larger, softer, and more blended cells. The added water also acts as a retarder, keeping the paint wet longer. This is ideal if you are working with thinned acrylics and want a more organic, flowing effect.
Potential Downsides: Acidity and Cloudiness
Using alcohol in your art is not without its challenges. Isopropyl alcohol is slightly acidic. Adding it to your acrylic mixture can lower the pH of the paint. Over time, this acidity could potentially affect the paint's integrity. You might also notice a cloudy or hazy film on the surface after the alcohol dries. This residue can dull your colors and reduce the vibrancy of your finished piece.
Luckily, you can easily solve this problem. Always allow your artwork to cure completely. This can take several days to a few weeks. Once it is fully dry, you must apply a quality varnish or sealer. The varnish creates a protective barrier. It locks in your colors, prevents the cloudy film from being visible, and ensures the long-term stability of your art.
Techniques for Creating Effects
Now you can move from theory to practice. Creating stunning effects with alcohol is easier than you might think. You just need the right supplies and a few core methods. Let's get you set up for success.
Essential Supplies for Your Project
Gathering your materials beforehand makes the creative process smooth and enjoyable. You do not need many items to start experimenting.
- Acrylic Paints: You can use any type of acrylic paint. However, high flow acrylic paints work especially well because their thin consistency allows the alcohol to move the pigments easily.
- Surface: A canvas, watercolor paper, or wood panel will work.
- Rubbing Alcohol: Keep both 70% and 91% isopropyl alcohol on hand to create different effects.
- Application Tools:
- A small spray bottle for spritzing.
- An eyedropper or pipette for controlled drops.
- Brushes for applying your paint.
- Water: You will need a cup of water for thinning paint and cleaning brushes.
- Varnish: A quality sealer is essential for protecting your finished art.
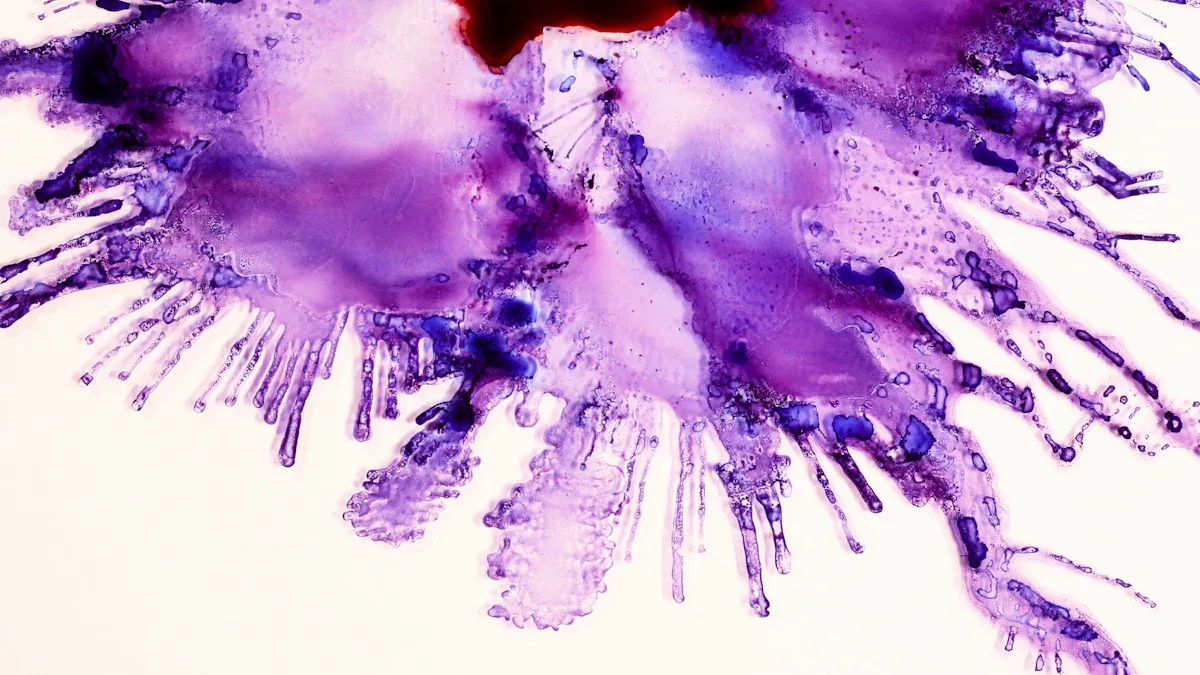
The Alcohol Spritzing Technique
The alcohol spritzing technique is a fantastic way to add texture and interest to a background. This fun background technique creates a constellation of tiny cells across your surface. The key to alcohol spritzing is controlling the amount of liquid you apply.
Your first step is to apply a wet layer of paint to your surface. You can use one color or blend several colors. While the paint is still very wet, hold your spray bottle about 8-12 inches away from the surface. Start spritzing lightly. You will see the spritzing effect appear almost instantly as the alcohol repels the paint.
For a more complex look, try layering multiple spritzed layers. Apply your first layer of spritzing. Wait a moment for the initial patterns to form. Then, you can add more spritzing to create overlapping spritzing patterns.
This technique is all about experimentation. The distance of your spritzing, the wetness of your paint, and the percentage of alcohol all change the final results. More spritzing creates a denser pattern, while less spritzing gives a more subtle texture. The alcohol spritzing method is perfect for creating abstract landscapes or cosmic scenes. Mastering alcohol spritzing will add a powerful tool to your creative arsenal.
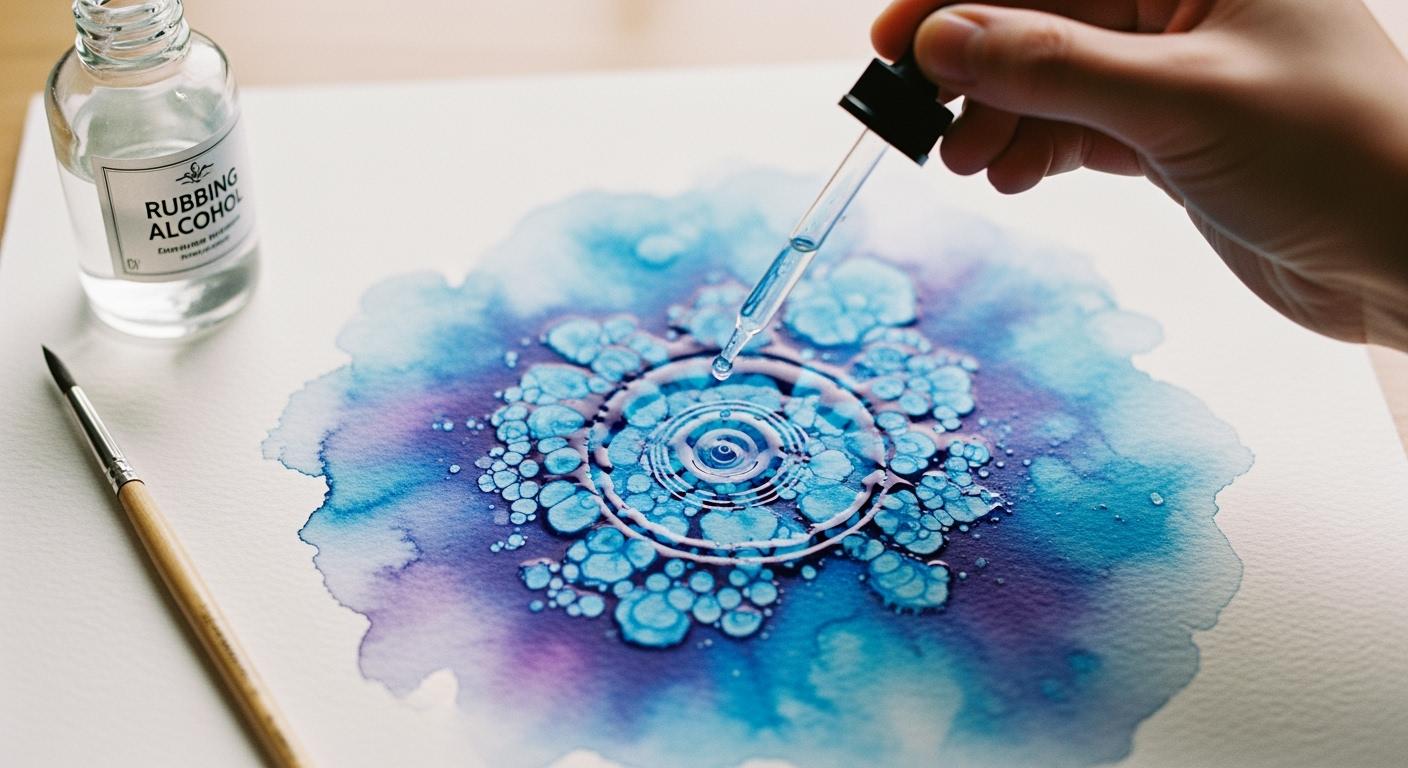
Using a Dropper for Blooms
Using a dropper gives you precise control over where you place the alcohol. This method is perfect for creating larger, more defined "bloom" or "bull's-eye" effects. You can even add color to your alcohol for unique results.
To create a bloom with a colored center, you can follow this process:
- Add a small amount of pigment or a drop of ink to your alcohol.
- Apply a wet wash of paint to your surface.
- Use a dropper to let drip on your page this colored alcohol mixture.
You will see a blob of color form in the middle with a distinct white ring around it. The wetness of your paper is very important. When the surface has visible pools of water and paint, the alcohol creates mesmerizing tie-dye effects. Using lighter colors with a dropper can produce more subtle cells that look like they have a nucleus and mitochondria. This technique allows you to place your effects exactly where you want them.
Popping Surface Bubbles
Tiny air bubbles can sometimes get trapped in your paint, especially in paint pouring projects. These bubbles can leave unwanted pits in your dried artwork. A light mist of alcohol is an excellent way to get rid of them.
Hold a spray bottle filled with 91% isopropyl alcohol about a foot away from your wet canvas. Give it a quick, light spritz. The alcohol will instantly pop the surface bubbles without disturbing your design.
While alcohol is effective, some artists prefer other tools. A torch is a common choice for popping bubbles in acrylic paint pouring. A heat gun is another alternative, but you must use it carefully. Its continuous hot air can push your paint around or make it dry too quickly.
Whether you use alcohol or a heat tool, the goal is a perfectly smooth, professional finish for your beautiful colors.
Stripping Dried Paint with Alcohol
Rubbing alcohol serves another important purpose beyond creating textures. You can use it as a powerful tool for corrections. This technique is for fixing mistakes or cleaning surfaces, not for adding creative effects to your art. Applying alcohol on dry paint can dissolve the acrylic binder, allowing you to remove unwanted sections.
When to Use Alcohol for Removal
You might need to remove paint for several reasons. Perhaps you used the wrong color in a specific spot or splattered paint where it does not belong. This method is especially helpful for detailed areas. If you apply a dark or saturated color by mistake, the alcohol softens the dried acrylic. This allows you to lift the offending paint without smearing it and ruining the surrounding details. You can remove the color partially or take it all the way down to the canvas.
Step-by-Step Stripping Process
Using alcohol to strip paint requires patience and a gentle hand. A higher concentration, like 91% isopropyl alcohol, works best because it is a stronger solvent.
Follow these steps for the best results:
- Test First: Always test the process on a small, hidden area of your painting to see how the surface reacts.
- Apply the Alcohol: Dip a cotton swab or a small, firm brush into the alcohol. Gently dab it onto the dried paint you want to remove.
- Wait and Rub: Let the alcohol sit for 30-60 seconds to soften the paint. Then, gently rub the area in a circular motion. The paint should start to lift.
- Clean the Residue: Use a clean cloth or paper towel to wipe away the loosened paint and alcohol residue. You may need to repeat the process for stubborn layers.
Safety Tip ⚠️: Always work in a well-ventilated area when using alcohol. The fumes can be strong, so opening a window or using a fan is a good idea.
This simple process gives you a second chance to fix mistakes and perfect your artwork.
Troubleshooting and Finishing
You may run into a few challenges while exploring these techniques. Do not worry, as most problems have simple solutions. Understanding how to troubleshoot and properly finish your piece is key to getting great results.
Why Aren't Cells Forming?
Sometimes the cells you expect do not appear. This issue usually relates to your paint's consistency or timing.
- Your paint is too dry: The effect only works on a very wet surface. You must apply the liquid while the paint is still fluid.
- Your paint is too thick: The viscosity of your paint matters. Thicker paint layers create smaller and denser patterns. If you want larger cells, you should thin your paint with a little water or a flow medium.
Fixing a Muddy or Blurry Effect
Your colors can become muddy if you apply too much liquid or overwork an area. This can cause the pigments to blend too much, losing their definition. If this happens, the best solution is to stop. Let the area dry completely. You can then paint over the muddy section and try again. For future projects, use a lighter touch and apply less liquid.
Sealing and Protecting Your Art
Protecting your finished piece is the most important final step. A good varnish safeguards your work from dust, UV light, and damage. It also enhances your colors.
An important rule to remember is that your sealant must not contain any alcohol. A varnish with it will reactivate the paint and ruin your beautiful effects.
When choosing a sealer for your art, look for these features:
- A clear varnish with an acrylic base.
- A product specifically labeled for acrylics.
- A spray-on varnish for delicate layers to avoid smearing the design with a brush.
Always let your painting cure completely for several days before you apply any varnish. This ensures a durable and professional finish.
You now know rubbing alcohol's dual role in your art. You can use it for creative techniques like alcohol spritzing. The spritzing effect from alcohol spritzing creates amazing textures. You can also use it for practical tasks like stripping paint. Your creativity unlocks endless creative possibilities with alcohol spritzing. Remember the most important rule for your art. You must let your work dry completely before sealing it. This protects your spritzing and ensures your spritzing lasts.
Now you can explore with confidence. Experiment with different spritzing methods. Try more alcohol spritzing. Your spritzing will improve with practice.
FAQ
Can I use other types of alcohol like vodka?
You should use isopropyl alcohol for the best results. Other spirits like vodka have different ingredients. These can cause unpredictable reactions. They may not create the desired cell effects in your paint.
Will rubbing alcohol damage my paint brushes? 🖌️
Alcohol can dry out your brush bristles. You should clean your brushes with soap and water immediately after use. This simple step prevents damage and keeps your tools in great condition.
What surfaces are best for alcohol techniques?
You will get great results on non-porous surfaces.
Try using gessoed canvas, wood panels, or ceramic tiles. These surfaces keep the paint wet longer. This gives the alcohol more time to create beautiful patterns and cells.
Can I mix alcohol directly into my paint cup?
You should avoid mixing alcohol directly into your paint. This starts the reaction too soon. You will lose the cell-forming effect. Always apply alcohol to the surface of wet paint for the best outcome.
See Also
Debunking Acrylic Tray Myths: Simple DIY Projects for Creative Minds
Flame Polishing Explained: Understanding Its Process and Practical Uses
Chemical Resistance in Acrylics: Defining Factors and Product Applications
Buffing and Sanding Acrylics: Process, Definition, and Manufacturing Applications
Anti-static Acrylic: Unveiling Its Principles, Definition, and Diverse Applications