Small-Space Merchandising 101 Stacking & Risers
Your passion for collecting is growing, but your display space is not. Many collectors face this challenge in small spaces. The global market for collections is booming, showing you are part of a massive community.

Effective small-space merchandising turns clutter into curated displays. You can achieve this with two simple visual merchandising principles:
- Go Vertical: Use stacking to maximize height.
- Create Tiers: Use risers to add depth and visual interest.
This merchandising approach ensures your prized items get the attention they deserve.
Small-Space Merchandising With Stacking

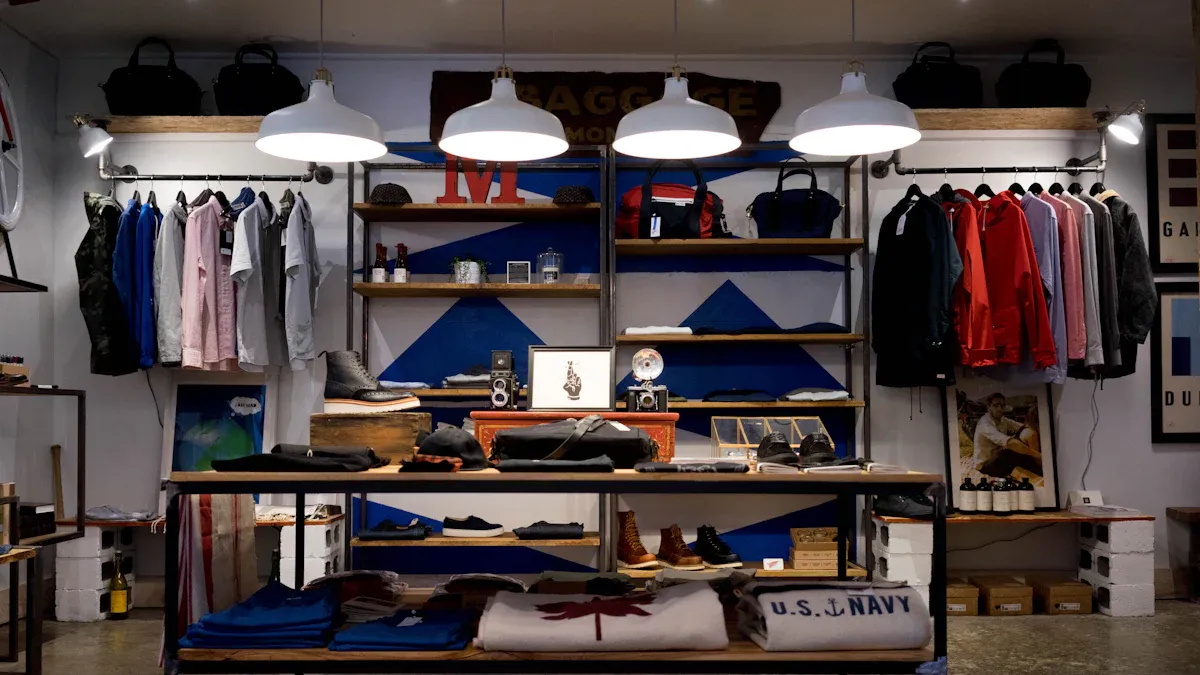
Going vertical is the first rule of effective small-space merchandising. You can reclaim valuable floor and surface area. Stacking builds your display upward, not outward. This method transforms crowded corners into impressive vertical showcases. It is a fundamental merchandising technique used in professional retail settings.
Build Vertically With Stackable Cases
Stackable cases are a collector's best friend. They offer protection and create a uniform, organized look. You can build a tower of your favorite items. This creates a powerful visual statement. Many brands offer excellent products for this purpose.
- For 1:64 Scale Models: You can find interlocking display stands from brands like Auto World and AMT. Johnny Lightning also offers interlocking cases, some with mirror backs and wall-mounting options.
- For Larger Scales (1:24, 1:18): You can find larger acrylic cases. Look for designs that are specifically made to be interlocking or stackable for safety. Some collectors even explore custom display cases for unique items.
Stability is crucial when stacking. The weight of your collectibles determines the right case thickness. Heavier items need thicker, stronger acrylic to prevent bowing or cracking.

Use this table as a guide for your collections.
| Load Type | Weight Range (pounds) | Recommended Thickness (inches) |
|---|---|---|
| Light Loads | 5-10 | ¼” to ⅜” |
| Medium Loads | 10-20 | ½” to ¾” |
| Heavy Loads | 20-30 | ¾” to 1” |
Use Wall-Mounted & Floating Shelves
Walls offer prime real estate in small spaces. Floating shelves provide excellent vertical storage without the bulk of a traditional bookcase. You can choose a material that matches your style and the weight of your collectibles.
| Material | Pros | Cons |
|---|---|---|
| Wood | Sturdy and long-lasting with a timeless quality. | Can be vulnerable to moisture and more expensive. |
| Metal | Extremely durable and easy to maintain. | Heavy, and the finish can be scratched by sharp objects. |
| Glass | Creates a modern, airy look that highlights items. | Fragile and not suitable for very heavy objects. |
Think beyond a single straight line. You can get creative with shelf placement.
- Use Corners: Install shelves in an empty corner to hold books or figures.
- Go Above Doorways: Place a shelf above a door for items you don't access daily. This draws the eye upward.
- Create Patterns: Arrange shelves in geometric or asymmetrical patterns for a dynamic look.
Consider some creative lighting ideas to make your shelves pop. Adding thin led strip lights under each shelf can illuminate the items below. This simple touch adds a professional and dramatic flair.
Declutter Surfaces in Small Spaces
A clean surface is a blank canvas for your display. Clutter distracts the eye and takes away from the impact of your collectibles. You must first clear your space before you can build an effective display. Professional organizers suggest a simple process.
- Clear Everything Off: Start with a completely empty surface.
- Choose Key Pieces: Select only your most meaningful or visually striking items to display. Prioritize quality over quantity.
- Group Objects: Arrange items in odd numbers, like groups of three or five. This is more visually appealing than even-numbered groups.
- Leave Breathing Room: Avoid overcrowding. Negative space allows each item to be seen and appreciated.
- Rotate Your Display: Keep your display fresh by changing out items seasonally or whenever you feel like it.
A decluttered space allows your best products to stand out. It gives each piece its own spotlight.
Editing down your décor gives the pieces you decide to keep more visual impact. Similar to an art gallery, each object is given space to shine. It's not about stripping a room bare — rather it's about allowing the best parts to stand out.
This approach ensures your display feels intentional and curated, not accidental and messy. The right led strip lights can further enhance this gallery-like effect.
Create Tiers With Display Risers

Stacking gets you height, but risers give you visibility. You can think of risers as stadium seating for your collectibles. They elevate items in the back so nothing gets lost in the shadows. This technique creates depth and visual interest, turning a flat shelf into a dynamic, multi-layer displays. Every piece of your collection gets a chance to be seen and appreciated.
Plan Your Space & Assess Your Collection
Proper planning is the key to a great display. Before you buy any display stands, you need to measure your space and understand your items. This simple preparation prevents you from buying risers that are too big or too small.
- Measure the Space: Start by measuring the width, depth, and usable height of your shelf or display case. Write these numbers down.
- Account for Item Dimensions: Look at the items you want to display. Measure the footprint and height of your largest and smallest pieces. This ensures you leave enough space around each one to avoid a cluttered look.
- Seek Visual Balance: Your goal is to choose risers that look right for your products. Taller risers work well for larger items, while smaller risers are better suited for smaller pieces.
This initial assessment of your collections helps you make informed decisions. It is the blueprint for your entire setup.
Choose The Right Risers
You have many options when it comes to risers. The material and type you choose will define the style of your displays.
Clear acrylic risers are a popular choice. They create a clean, modern "floating" effect that puts all the focus on your items. Wood risers offer a classic, warm feel that can complement traditional decor. You can even make your own risers, which is a great way to get a custom look on a budget. Some people get creative by transforming everyday items into makeshift stands.
I was essentially making my own display riser out of boxes covered with pretty napkins, empty spools of ribbon, wadded paper, empty cans (full cans) – you name it I used it! There is a time to recycle and it’s not in our decorating! This is why there is a need to make our own display risers!
You can avoid a messy look by transforming everyday items into polished stands. A simple DIY project using budget-friendly materials can produce professional results. Consider this easy project:
- Get some wooden plaques in various sizes.
- Find finial dowel caps or small candle cups to use as legs.
- Use wood glue to attach the legs to the plaques.
- Paint or stain the finished stands to match your room.
Matching the riser type to your collectibles is also important.
- Multi-Step Risers: These are perfect for displaying a group of similar-sized items, like a squad of 1/12 scale action figures or a series of Funko Pops. The tiered steps ensure you can see every figure clearly.
- Single Blocks or Pedestals: These display stands are ideal for highlighting a single hero piece. Use them to elevate a prized sneaker, a boxed model car, or a signature statue. They tell the viewer, "This item is special."
Arrange Items For Full Visibility
How you arrange your items on the risers is the final, crucial step. A thoughtful layout creates a clean, organized look that draws the eye. You can use a few simple principles from professional visual merchandising.
One powerful technique is the Pyramid Principle. You place your main, most important item in the center. Then, you arrange smaller or secondary items on the sides, forming a triangle shape. This layout naturally directs the viewer's eye to the central product.
Another guideline is the Rule of Three. Grouping items in odd numbers, like three or five, often creates more visual interest than even numbers. You can apply this by arranging your products into short, medium, and tall categories to create an appealing, asymmetrical look.
Pro Tip 💡 Avoid overcrowding your risers. Leaving a little "breathing room" around each item helps it stand out. Group similar items by color, size, or category to make your displays easy to scan and appreciate.
Finally, consider adding lighting to make your display truly pop. Many collectors use lighting to enhance their displays and create a premium feel.
| Lighting Technique | Description | Recommended Light Type | Visual Effect |
|---|---|---|---|
| Layering | Placing lights under or behind risers. | LED Strip Lighting | Highlights different levels and adds depth. |
| Directional | Focusing a light on a key item. | Small Spot Lighting | Creates contrast and draws attention. |
| Backlighting | Putting lights behind a riser. | Soft LED Panels | Creates a halo effect that makes items pop. |
Experimenting with different arrangements and lighting will help you find the perfect look for your 1/12 scale action figures and other prized possessions. Using budget-friendly materials and smart layout principles, you can build a display that looks professional and showcases your passion.
Maximizing Shelf Space By Combining Techniques
You can master small-space merchandising by combining stacking and risers. This powerful pairing is the secret to maximizing shelf space. It transforms a simple shelf into a dynamic showcase that looks professionally designed. These methods help you build impressive displays that capture attention.
Create A 'Stadium' Effect
You can create a "stadium" effect within your display cases or on your shelves. This visual merchandising technique ensures no item is hidden. Imagine displaying a branded line of shoes. You can place each shoe on a separate riser of a slightly different height. This creates a multi-layer displays where every product is visible. This approach turns your collection into something that rivals professional retail displays, improving the at-home in-store experience. This merchandising strategy guides the eye across all your prized products.
Layer Risers On Top Of Stacks
You can create a clear focal point by layering different elements. This method adds height and importance to a single item. You can use a stack of books or even your existing stackable custom display cases as a base. Then, place a small riser or one of your display stands on top.
Display Idea 💡 Use a stack of vintage books as a base. Place a single, treasured figurine on a small acrylic block on top of the books. This simple setup elevates your favorite piece and tells a story.
This technique is perfect for highlighting a premier collectible. It draws the eye directly to the item you want to feature most.
Add Depth To A Single Shelf
A single flat shelf can look boring. You can add depth and visual interest by using display stands of varying heights. This strategy creates layers that make your displays more engaging. You can elevate items like candles or plants to achieve balance next to taller objects.
- Guide the Eye: Different heights guide the viewer's eye through your collection.
- Group Items: Keep similar items together on risers for an organized look.
- Leave Space: Avoid overcrowding your risers so each piece can stand out.
This is a key part of maximizing shelf space. For a final touch, consider some creative lighting ideas. Placing thin led strip lights under the risers or along the back of the shelf can make your collection pop. The right led strip lights can turn a simple retail setup into a stunning feature.
Common Mistakes In Collectible Displays
Creating a great display also means knowing what to avoid. Many collectors make a few common errors that can undermine their efforts. You can create more professional and impactful displays by steering clear of these simple mistakes.
The Problem Of Overcrowding
You might feel the need to display every item you own. This often leads to overcrowding, the most common mistake. When too many products are crammed together, your display can look like a wall of clutter. This prevents viewers from appreciating the details of individual pieces.
A cluttered, overcrowded shelf has less impact than a carefully curated selection, diminishing the value and appeal of individual items.
Overcrowding makes even valuable collections appear overwhelming instead of curated. It prevents your key products from getting the attention they deserve.
Using Unstable Or Mismatched Risers
Your choice of risers is critical for both safety and style. Using the wrong ones can create problems.
- Unstable Risers: You should avoid stacking items in unstable piles. If you must stack, use platforms or risers designed for collectibles. A wobbly setup risks damaging your prized possessions.
- Mismatched Styles: A mix of riser styles or colors can make your display look disjointed. Consistency is key for a professional retail look. An asymmetrical or chaotic design can reduce visual interest.
Using the right risers ensures your display is secure and visually cohesive.
Forgetting About 'Breathing Room'
Breathing room is the negative space you leave around each item. This cost-free method immediately enhances your display. It gives the viewer's eye a place to rest and helps balance your layout. When items are too close together, they can be easily overlooked. Giving your items space helps them stand out and improves the at-home in-store experience. This open space allows you to highlight specific pieces without creating clutter.
You now have the tools for successful small-space merchandising. Combining vertical stacking with tiered risers is the key. This method creates clean, organized displays where every item shines. It helps all collectors turn a cluttered corner into a professional showcase.
Your Turn! 🚀 Choose one shelf or a small area. Start experimenting with these techniques today. You can build a display that truly highlights your passion.
FAQ
How do I choose the right riser size?
You should measure the base of your collectible first. Choose a riser that is slightly larger than the item's footprint. This provides stability and a clean look. Make sure the riser's height fits your shelf space and elevates the item enough to be seen.
What is the best way to light my display on a budget?
LED strip lights are an excellent, budget-friendly choice. You can stick them under shelves or behind risers to create a professional glow. They produce very little heat, which keeps your collectibles safe. This simple addition makes your display stand out.
Can I mix different types of collectibles on one shelf?
Yes, you can create a great mixed display. Group items by a common theme, color, or size to create a cohesive look. Using risers helps give each unique piece its own space. This strategy makes your shelf look curated instead of cluttered.
How often should I rotate the items in my display?
You can rotate your collection every few months or with the seasons. This keeps your display feeling fresh and exciting. It also gives you a chance to appreciate different pieces from your collection. There is no single right answer, so do what feels best for you.