Requesting Samples Your 2025 Retail Display Guide
A physical sample is your final, critical checkpoint before committing to a large purchase order. Visual merchandising is powerful. It influences nearly 60% of in-store purchase decisions. Requesting samples is an essential process to prevent costly mistakes. Your inspection ensures the final product is functional, durable, and perfectly aligns with your brand.
Your Core Inspection Pillars:
- Material Quality
- Dimensional Accuracy
- Structural Durability
- Brand Representation
This vital step confirms your display will perform exactly as you need it to in a busy retail environment.
Key Checks When Requesting Samples
Your first step is to check the physical material itself. The quality of the acrylic directly impacts your display's appearance and lifespan. When requesting samples, you must verify you are getting exactly what you paid for.
Confirm Material Grade and Thickness
You should receive the correct material grade for your needs. High-quality, cell-cast acrylic offers excellent clarity and durability. Low-grade acrylic, in contrast, can yellow over time and may scratch or crack easily. For many applications, sign grade acrylic is a great choice because it offers enhanced strength and is built to last in busy environments.
Thickness is just as important. The right thickness ensures your display can support your products without bending or breaking. A small change makes a big difference. Doubling the thickness of an acrylic sheet can make it nearly eight times stronger. Use your sample to confirm the thickness matches your technical drawings.
General Thickness Guidelines:
- Small Countertop Displays: 3mm
- Medium Countertop Displays: 4-5mm
- Large Countertop or Floor Displays: 6-8mm for panels
- Shelving for Heavy Items: 10-15mm
Assess Optical Clarity and Purity
A great acrylic display should be crystal clear. Hold your sample up to the light. You want to see through it without any distortion. Look for signs of low-purity material, which can cause issues.
- Cloudiness or Haze: This indicates impurities or low-quality additives.
- Yellow Tint: This is a common defect in low-grade acrylic that worsens with light exposure.
- Tiny Cracks (Crazing): Look closely at the surface for a network of hair-like cracks. This can be caused by material stress or chemical reactions.
Pro Tip: Professionals use the ASTM D1003 standard to measure light transmission and haze. While you won't run this test yourself, a visual check for high clarity and zero haze tells you the manufacturer is using quality materials. Requesting samples allows you to spot these flaws before a full production run.
Verify Dimensions and Product Fit
An attractive display is useless if it does not fit your products or your retail space. You must check every measurement. This step ensures your final displays will function correctly.
Measure Against Technical Drawings
Your first action is to compare the sample to your technical drawings. Use a digital caliper for precise measurements. Check the height, width, depth, and the dimensions of any internal compartments or slots.
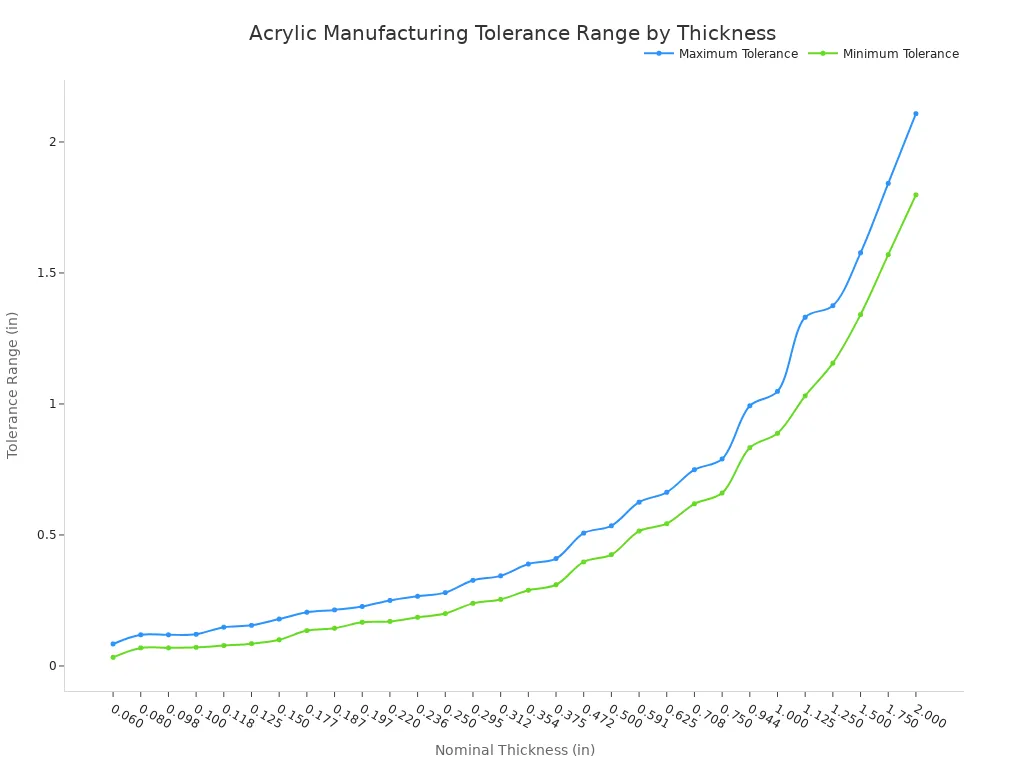
A small amount of variation, or tolerance, is normal in manufacturing. CNC machining can achieve accuracies from ±0.005″ to ±0.02″. The material type also affects this. Cast acrylic generally allows for tighter tolerances than extruded acrylic. Your supplier should tell you their standard tolerance. Any measurement outside this agreed-upon range is a red flag.
Pro Tip: Manufacturers use advanced tools like 3D laser scanners and software like Geomagic Control X. They compare a scan of the sample directly to the CAD file. This creates a 3D color map showing any deviations, ensuring high precision before production.
The thickness of the acrylic sheet itself has its own tolerance. Thicker materials naturally have a wider acceptable range.
Conduct a Real-World Fit Test
Technical measurements are only half the story. You need to perform a real-world test. This is a key reason for requesting samples. Place your actual products into the display.
- Do they fit securely without being too tight or too loose?
- Can customers easily remove and replace the products?
- Does the display sit flat and stable on a countertop?
- If it has multiple parts, do they assemble easily and correctly?
This practical test reveals potential design flaws that numbers alone cannot. It confirms the display is not just made correctly but is also functional for both your staff and your customers.
Analyze Structural Integrity and Stability
A display's appearance matters, but its strength is what guarantees a long service life. Your sample must prove it can handle the demands of a busy retail floor. A 2024 survey showed that 58% of retailers see damage to acrylic displays in high-traffic areas. This check ensures your investment is a durable one.
Examine Joints and Bonded Edges
The joints are often the weakest points of an acrylic display. You should inspect them closely. Look for a clean, bubble-free bond. Any visible air pockets or gaps signal a weak connection that could fail under stress. Modern adhesives create incredibly strong bonds. For example, some advanced methods like bulk polymerization can create joints with over 85% of the base material's strength.
The type of bonding agent used also makes a significant difference in durability. Stronger adhesives provide better long-term performance.
| Bonding Agent Type | Application | 7 Days Tensile Adhesion Strength |
|---|---|---|
| SikaLatex® (Acrylic) | Slurry, scrub coat | 950 psi (6.6 MPa) |
| SikaLatex® (Acrylic) | Primer | 1,200 psi (8.2 MPa) |
A strong, clean bond is a sign of quality manufacturing.
Perform a Stability and Load Test
This practical test reveals how the display will perform in the real world. Place the sample on a flat surface and gently push it from different angles. It should not wobble or tip easily. A wide, stable base is crucial for preventing accidents. Requesting samples is the perfect time to identify these potential issues.
Next, load the display with your products or equivalent weights. Watch for any signs of bending, sagging, or stress. Pay attention to common design flaws that cause instability:
- Improper Weight Distribution: The display may tip if heavier items are not placed correctly.
- Incorrect Assembly: Misaligned parts or loose fasteners can make the entire structure unstable.
This test confirms the display is not only built well but is also designed to be safe and functional in your store.
Perform Advanced Durability Tests
Your display must withstand more than just the weight of your products. It needs to survive daily interactions in a busy retail environment. You can perform several simple but effective tests on your sample to simulate real-world wear and tear. These checks give you confidence in the display's long-term performance.
Test for Scratches and UV Resistance
First, you should check the surface durability. You can perform a simple scratch test to see how the material holds up. Gently try to scratch an inconspicuous area with a fingernail or a plastic coin. Acrylic has a Mohs hardness of about 3, while glass is much harder at around 6. This means acrylic will scratch more easily, so you are looking for a reasonable level of resistance, not complete immunity.
Next, test for UV resistance. Place the sample in a sunny window for several days. You want to check for any signs of yellowing or degradation. Quality acrylic contains UV stabilizers to prevent this.
Pro Tip: Manufacturers use standards like ASTM G154 to test for UV resistance in a lab. Your simple test helps confirm they used a quality, UV-resistant grade for your display.
Check Chemical and Impact Resistance
Your staff will clean the displays regularly. You must ensure the acrylic and any branding can withstand common cleaning agents. Apply a small amount of isopropyl alcohol to a hidden spot. Let it sit for a minute, then wipe it away. Check for any hazing, cracking, or smudging of printed graphics. Cleaners with ammonia or solvents like acetone can cause permanent damage, so this test confirms the material's resilience.
Finally, evaluate the display's ability to handle accidental impact. Perform a controlled drop test from a low height onto a padded surface. You are not trying to break the sample, but to check for weak points. Look closely at the joints and edges for any new cracks or signs of stress. Standard acrylic has an Izod impact strength of about 0.4 ft-lb/in. This test shows you how that number translates to real-world durability in a busy store.
Inspect Branding and Overall Finish

Your display is a direct reflection of your brand. The final visual inspection ensures it communicates quality and professionalism. This step confirms that every detail, from the polish of the edges to the color of your logo, is perfect.
Evaluate Edge Finishing and Polish
First, carefully examine the edges of the sample. Run your finger along them to feel for smoothness. The edges should be safe to touch, not raw or sharp. Manufacturers use two common methods to create a high-quality finish.
- Flame Polishing: This technique uses heat to create a glossy, clear edge.
- Diamond Polishing: This method uses a specialized tool to cut the edge, resulting in a superior finish.
Both techniques produce a similar glossy effect. However, diamond polishing creates a brighter edge with greater optical clarity. Also, inspect the large, flat surfaces of the acrylic. Look for any fine scratches or circular marks, known as polishing swirls, which can detract from the display's premium look.
Verify Branding and Graphic Application
Your branding must be flawless. If your display includes a printed logo, you need to check its color accuracy. Compare the color on the sample directly against your official brand Pantone codes to ensure a perfect match. For engraved logos, inspect the depth and cleanliness of the lines. The engraving should be consistent and free of any rough spots.
If your display uses applied vinyl graphics, you must check for application errors. Look closely for these common defects:
- Bubbles or wrinkles under the surface
- Edges that are peeling or curling up
- Distorted or warped graphics
Pro Tip: A perfect graphic application is smooth and fully adhered. Any lifting or bubbling suggests a poor application process that could lead to the graphic failing prematurely in your store.
You have now inspected every critical aspect of your sample. This final checklist helps you make a clear "Go/No-Go" decision. Your sample must meet all documented specifications before you approve full production.
Your Final Go/No-Go Checklist
- Material & Dimensions: Does the sample use the correct material grade and thickness? Do all measurements match your technical drawings?
- Structure & Durability: Is the display stable and strong enough for a retail environment?
- Finish & Branding: Does the display perfectly represent your brand's quality and image?
A "pass" on all points gives you the confidence to place your bulk order. Any "fail" requires you to contact your supplier immediately. You must request a revised sample before moving forward.
FAQ
What should I do if my sample fails inspection?
You should contact your supplier immediately. Provide clear feedback and photos showing the specific problems. Explain what needs to be corrected. Always request a revised sample that meets your standards before you approve the full production run. This step prevents costly errors.
How long does it take to receive a sample?
You can typically expect to receive a sample within 1 to 2 weeks. However, the timeline depends on your display's complexity and the supplier's current workload. You should confirm the estimated delivery date with your manufacturer when you place the sample order.
Do I have to pay for samples?
Supplier policies vary. Some manufacturers charge a fee for samples to cover material and labor costs. Others may offer free samples or credit the sample cost back to you if you proceed with a large bulk order. Always clarify the cost upfront.
What is the difference between a prototype and a production sample?
A prototype is an early model used to test a design concept. A production sample is made using the final materials and manufacturing processes. You inspect the production sample to approve it for mass production, ensuring it represents the final quality.