What to Know About Mod Podge Photo Transfer
Let's clarify a common question about the mod podge photo transfer process. You can use regular mod podge, but it will not create a true, opaque photo. For a professional result, you must use the Mod Podge Photo Transfer Medium.
Note: Standard mod podge creates a transparent decal where white areas disappear. The Mod Podge Photo Transfer Medium is a special photo transfer medium that produces a solid photo, keeping all the white parts intact. This is the key to successful photo transfers.
Regular Mod Podge vs. Photo Transfer Medium
You need to choose the right product for your project. The difference between regular Mod Podge and the specialized medium determines your final result. Let's explore what makes each one unique.
The Regular Mod Podge Method
You can think of this technique as creating a transparent decal. The regular Mod Podge formula is not designed to transfer the white parts of your image. Instead, any white area on your paper will become clear. This allows the surface underneath, like the grain of a piece of wood, to show through your photo. This can be a beautiful, rustic effect if that is your goal.
Important Printer Note ⚠️ You cannot use just any printout for this method. Inkjet prints will smear and are unsuitable for photo transfers. You must use a laser printer or a dry toner copier. If you have a standard photo, you need to get a color copy of it from a print shop using one of these machines.
This method uses a more affordable product, but it limits the type of photo and the final look you can achieve.
The Specialized Medium Method
For a true, opaque image, you must use the Mod Podge Photo Transfer Medium. This product is a thick, white gel specifically made to lift the entire image—ink and all—from the paper. It creates a solid, non-transparent transfer that looks like the photo was printed directly onto your surface. All the white areas of your original photo will remain white in the final project.
The Mod Podge Photo Transfer Medium is a versatile and reliable choice for professional results.
- Formula: It is a water-based and non-toxic formula.
- Printer Type: It also requires images printed on a laser or dry toner printer.
- Surfaces: You can use it on wood, fabric, canvas, glass, and more.
- Cleanup: Cleanup is simple with just soap and water.
While this specialized medium costs more per ounce, the investment ensures a high-quality, opaque mod podge photo transfer. The price difference reflects its unique formulation for perfect photo transfers.
| Product | Size | Price | Cost per Ounce |
|---|---|---|---|
| Mod Podge® Photo Transfer Medium | 8 oz. | $9.99 | $1.25 |
| Mod Podge® Matte | 8 oz. | $4.99 | $0.62 |
Choosing this medium is the key to creating a crisp and vibrant photo project.
Comparing the Transfer Process and Results
The application process and the final look of your project differ greatly between the two products. Understanding these differences helps you choose the right path for your creative vision. Your choice of medium directly impacts both your workflow and the finished appearance.
Key Differences in Application
The steps you take to complete your project are not the same for each product. One method is quick and simple, while the other requires more time and patience for a professional result.
The Regular Mod Podge Process: This application is straightforward. You essentially glue the paper image onto your surface.
- You apply a thin layer of regular mod podge to your surface.
- You press your laser-printed image face-up onto the glue.
- You apply another top coat to seal it. The paper itself remains a permanent part of the project.
The Photo Transfer Medium Process: This method is more involved but creates a true image transfer. It requires you to lift the ink from the paper and leave the paper behind.
Tools You'll Need 🛠️ To get the best results with the photo transfer medium, you should gather a few specific tools.
- Waxed paper to protect your work surface
- The medium itself
- Your photo printed from a dry toner printer
- A brush for application
- Scissors
- A Mod Podge brayer (a small roller) to ensure a smooth, bubble-free application
The process for this mod podge photo transfer is a multi-step journey.
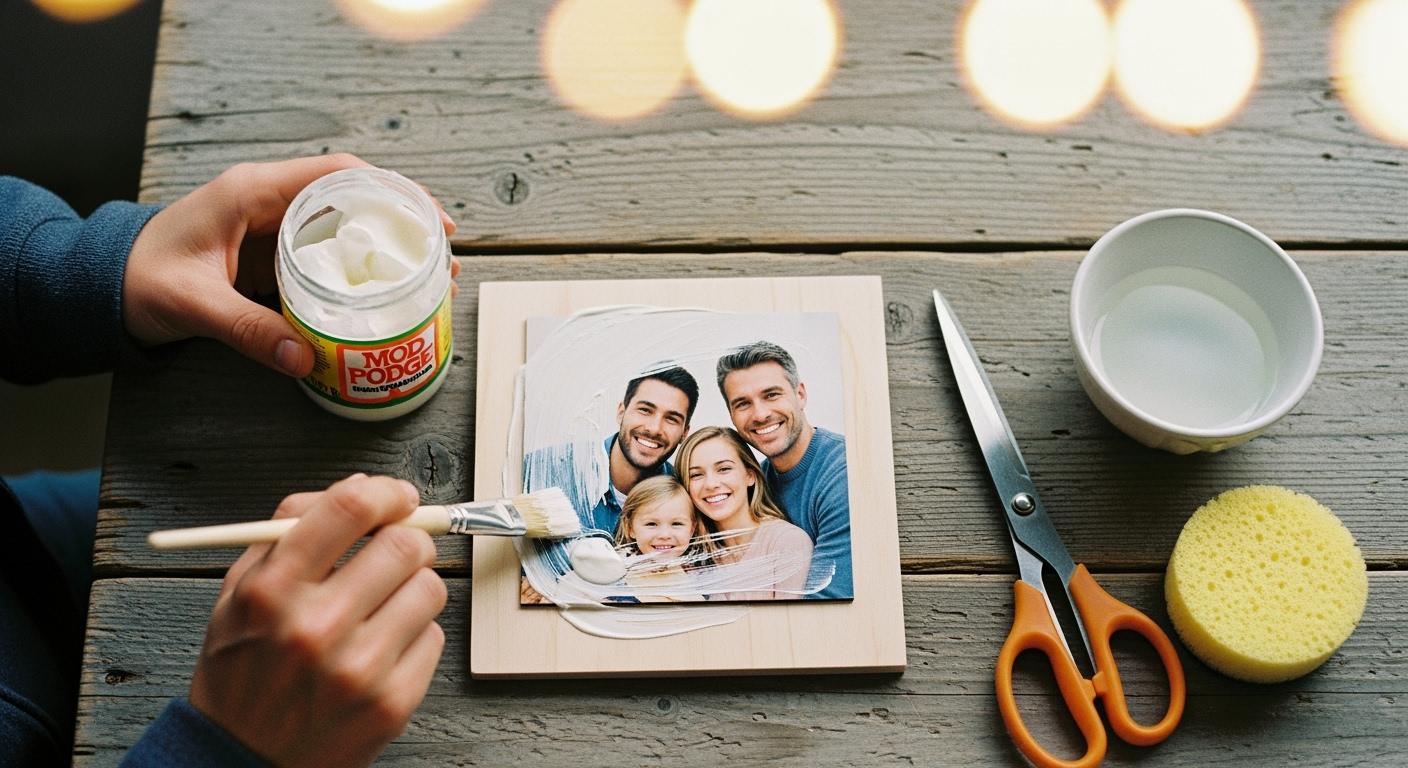
- You apply a thick, even coat of the medium directly onto the front of your photo.
- You place the photo face-down onto your surface (wood, canvas, etc.).
- You use a brayer or your fingers to smooth it out and remove any air bubbles.
- You must let the project dry completely for 24 hours. Do not rush this step.
- After 24 hours, you use a damp sponge or cloth to wet the paper backing.
- You gently rub away the paper layers, revealing the transferred image underneath.
Final Appearance and Durability
The final look and feel of your photo transfers will be completely different depending on the product you use.
The regular mod podge method leaves the paper visible. The result is a semi-transparent image where the paper's white areas become clear, allowing the texture of the surface to show through. This creates a rustic, layered, or decoupage-style effect. The image is sealed under a protective coat, but the paper is still there.
The Mod Podge Photo Transfer Medium creates a crisp, opaque image. The final result looks like the photo was printed directly onto the surface. The white parts of your image remain solid white, leading to a vibrant and professional-looking piece. Once the paper is rubbed away, only the ink transfer remains, bonded to the surface.
Here is a simple comparison to help you decide:
| Feature | Regular Mod Podge | Photo Transfer Medium |
|---|---|---|
| Final Look | Semi-transparent, rustic, decal-like | Opaque, crisp, "printed-on" look |
| White Areas | Become clear, surface shows through | Remain solid white |
| Paper | Remains part of the final project | Is completely rubbed away |
| Best For | Vintage or layered decoupage effects | Professional, high-quality photo gifts |
Ultimately, the durability of both is excellent once sealed, but the visual outcome is the most important distinction.
How to Get a Perfect Mod Podge Photo Transfer
You can achieve a flawless result with the right materials and techniques. Following these steps carefully will help you avoid common mistakes and create a beautiful project. This guide focuses on using the specialized medium for the best outcome.
Choosing the Right Printer and Paper
Your choice of printer and paper is the most critical step. Success in photo transfers starts here.
- Printer Type: You must use a laser printer or a dry toner copier. Inkjet printers cause the ink to smear and will not work for this process.
- Paper Type: Use regular, thin copy paper. Do not use glossy photo paper or thick cardstock. These papers are difficult to remove and can ruin your project.
- Image Orientation: You must print your image in reverse (mirrored). Any text or numbers in your photo will appear backward if you skip this step.
The Correct Transfer Process Step-by-Step
Patience is key to a perfect mod podge photo transfer. This process requires you to follow each step without rushing.
- Prepare Your Surface: Make sure your surface (wood, canvas, etc.) is clean and dry. You can sand wood for better ink absorption.
- Apply the Medium: Use a brush to apply a thick, even layer of the mod podge photo transfer medium directly onto the printed side of your photo.
- Place and Smooth: Carefully place the photo face-down onto your surface. Use a brayer or a credit card to smooth it out, removing all air bubbles.
- Wait 24 Hours: Let the project dry for a full 24 hours. Do not try to speed up this step. Waiting is essential for the image to bond correctly.
- Remove the Paper: After 24 hours, wet the paper backing with a damp sponge. Let the water soak in for a couple of minutes. Then, gently rub the paper away with your fingertips in slow, circular motions. You may need to repeat this wetting and rubbing process several times to remove all paper fibers.
Troubleshooting Tip 💡 If you see a cloudy white film after the project dries, it means some paper fibers are still there. Simply re-wet the area and gently rub again until the image is clear.
Sealing Your Finished Project
After you have removed all the paper and the image is completely dry, you need to seal it. This final step protects your work and makes the colors pop. Apply a thin, even layer of a mod podge sealer over the entire image. You can use a matte or gloss finish depending on your preference. Let the sealer dry completely. This protects your new artwork from damage and gives it a professional finish.
You can create a decal-style photo with regular mod podge. However, for a true, opaque mod podge photo transfer, the Mod Podge Photo Transfer Medium is your only choice. Understanding the difference between the photo transfer medium and other glues is the key to avoiding project failure. Simple choices, like using regular copy paper for your photo, also ensure a great result.
Choose your medium based on your desired outcome: transparent decal or opaque transfer.
FAQ
Can I use a real photograph for the transfer?
No, you should not use your original photograph. The transfer process will destroy the paper. You must make a copy of your photo. Use a laser printer or a dry toner copier for the best results. This protects your precious memory and ensures the transfer works correctly.
Why is my transferred image sticky?
Your project might feel sticky if you have not sealed it. The Photo Transfer Medium can remain slightly tacky even when dry. You need to apply a top coat of Mod Podge sealer. This final step removes the stickiness and protects your finished artwork from damage.
What if I see a white haze on my image?
A white haze means small paper fibers are still on your project. You can easily fix this.
- Gently wet the hazy area with a damp cloth.
- Use your fingertips to rub the spot in a circular motion.
- Let it dry completely to see if the haze is gone.
Can I really not use an inkjet printer?
You must avoid inkjet printers. The ink from an inkjet printer is water-based and will smear when you add the medium or water. This creates a blurry mess instead of a crisp image. Always use a laser printer or a dry toner copy for a successful transfer.
See Also
Unveiling Acrylic Tray Truths: Simple DIY Projects to Inspire Creativity
Understanding Impact-Modified Acrylic: Properties, Benefits, and Practical Uses Explored
Choosing and Maintaining White Acrylic Trays: A Comprehensive Care Guide
Ten Chic Methods to Elevate Your Decor Using Acrylic Trays
Recycled Acrylic (r-PMMA): Understanding Its Nature, Production, and Diverse Uses