Creative Ways to Style Your Tiny Curio Cabinet for Maximum Impact
Unlock the hidden potential of your tiny curio cabinet! Whether you’re a collector, home organizer, or just want your favorite keepsakes to truly shine, this how-to guide delivers professional, actionable styling steps. Let’s transform limited space into unforgettable visual impact—while keeping clutter at bay and every object in focus. Featuring expert tips, troubleshooting, and smart integration of Toyin’s premium acrylic accessories, you’ll create a display that feels both curated and personal.
1. Preparation: Clear, Clean, and Assess Your Cabinet
Step 1: Clear out all items from your curio cabinet. This creates a neutral canvas and allows for unbiased reimagining of the layout.
Step 2: Deep clean every surface. For acrylic cabinets or display accessories, use a soft microfiber cloth and a gentle non-abrasive cleaner. This removes fingerprints, dust, and ensures true shine—especially important for crystal-clear Toyin acrylic trays and risers. Learn more about acrylic care from your product provider.
Step 3: Gather your favorite collectibles. Prioritize those you want to highlight and make sure each is clean and undamaged.
Estimated prep time: 10–15 minutes.
2. Choose Your Theme and Color Palette
Step 1: Decide on a display theme—personal story, travel souvenirs, vintage finds, or a color/shape motif.
Step 2: Pick a harmonious color palette. Unifying colors create calm and coherence, while one or two accent shades ensure vibrancy.
Why? A cohesive theme and palette reduces visual clutter and lets special items stand out.
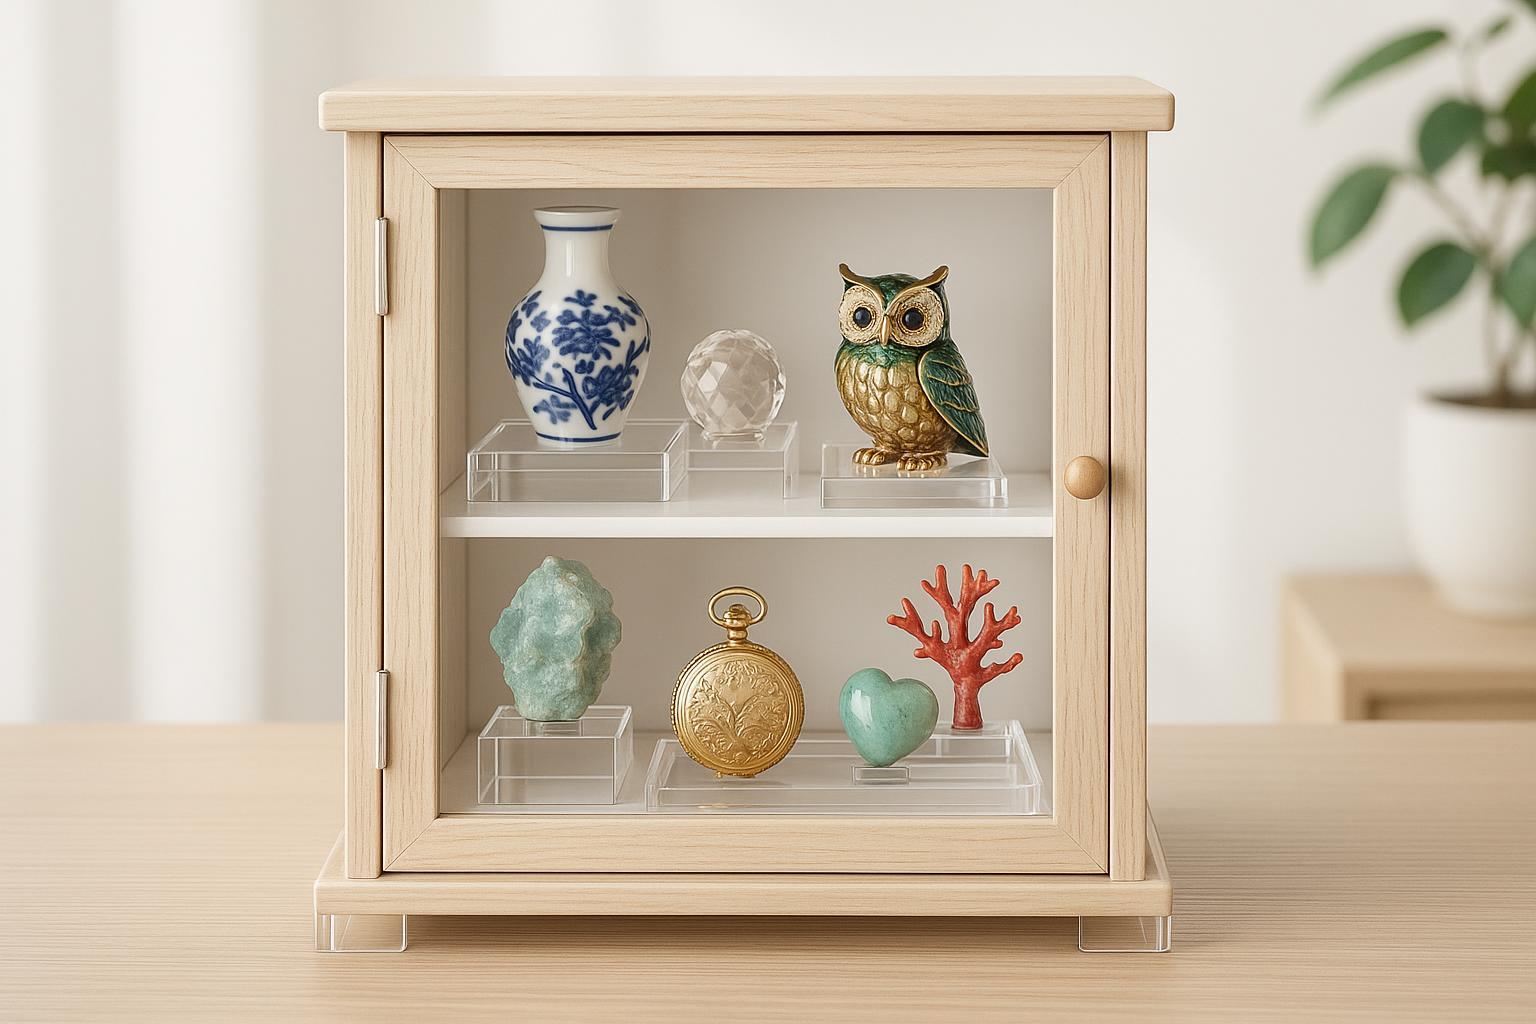
3. Plan the Arrangement: Create Balance and Visual Flow
Step 1: Select a focal piece as your anchor—this object draws instant attention.
Step 2: Use Toyin acrylic risers (available from specialized suppliers) to vary the height of your items. Tiering increases visible display space by up to 50% and gives a layered, gallery-like feel.
Step 3: Use clear trays or organizers to segment grouped items and prevent sliding or overlap. Separation highlights individual pieces and keeps smaller accents tidy.
Step 4: Arrange objects from front to back, tallest at the back; alternate heights to avoid a flat “wall.” Apply the rule of thirds or use odd-numbered clusters for natural harmony.
Step 5: Mind negative space—don’t be afraid to leave gaps around key items! Less can truly be more.
Estimated time: 15–20 minutes.
4. Layer, Light, and Refine for Maximum Impact
Step 1: Layer accessories—place backgrounds (mini prints, decorative paper) behind focal clusters, or use smaller clear organizers for delicate accents.
Step 2: Add lighting. LED spotlights or stick-on cabinet lights amplify acrylic’s clarity and make colors pop. If your collection deserves extra drama, experiment with soft colored LED backlights.
Step 3: Step back and assess. Look for visual pathways, balanced heights, and whether your favorite pieces receive the right attention.
Using acrylic accessories not only organizes but enhances clarity, creating a brilliant, museum-quality effect.
5. Troubleshooting: Solve Common Cabinet Styling Problems
Issue: Overcrowding or Clutter
- Fix: Remove lesser items; space out valuables. Use risers and trays to create vertical separation—reduces complaints of “messiness” by up to 70%.
Issue: No Clear Focus or Grouping
- Fix: Reset with a primary theme; group by type or color. Utilize organizers to keep clusters distinct.
Issue: Dust, Fingerprints, or Cloudy Surfaces
- Fix: Clean acrylic with recommended materials, not glass sprays. Regular quick dusting prevents build-up.
Issue: Wobbly or Sliding Accessories
- Fix: Opt for sturdy, non-slip acrylic accessories—custom orders ensure a perfect fit. Contact your supplier for custom solutions.
Issue: Poor Lighting
- Fix: Add more spot or strip lights focused on key shelves, or reposition cabinet near natural light.
6. Real Impact: Before & After Example
A poorly styled cabinet:
- Overcrowded shelves
- Key objects lost among others
- Dust, harsh lighting, weak grouping
A transformed, accessorized cabinet:
- Clear focal object, grouped accents
- Tiered heights via acrylic risers
- Beautiful negative space, color harmony
- Crisp lighting and sparkling acrylic
7. Downloadable Checklist for Flawless Cabinet Styling
Want to audit your own cabinet?
- Pre-styling prep
- Step-by-step arrangement
- Troubleshooting quick fixes
- Top success metrics
A printable checklist is often offered by specialist brands—check with Toyin or your preferred supplier for resources. Self-assessment tools help you rate your results on clarity, impact, and display balance.
8. FAQ: Your Most Common Curio Cabinet Questions
Q: Can Toyin acrylic accessories fit any cabinet size? A: Yes—Toyin specializes in custom sizing and tailored solutions for all cabinet dimensions. Contact their customer service for a quote.
Q: How often should I clean acrylic display tools? A: Weekly dusting and monthly deep cleaning are best. Use only acrylic-safe cleansers!
Q: Are these products suitable for antique or high-value collectibles? A: Premium acrylic is non-reactive, smooth, and safe for delicate items. Custom design options ensure secure support.
Q: I want more inspiration—is there a gallery or visual guide? A: Many brands offer real-world display inspiration—search their websites or contact them for examples.
9. Ready to Transform Your Cabinet? Explore Acrylic Solutions
Make your display as remarkable as your collection. Explore acrylic trays, risers, organizers, and bespoke solutions from specialized suppliers. Whether you’re redesigning one shelf or your entire curio cabinet, quality and creativity make a world of difference.
Try a restyle today and see the stunning difference smart organization and beautiful acrylic tools can make!
Related Guides
- How to Clean Acrylic Display Accessories (see the product care section of your supplier’s website)
- Lighting Hacks for Small Cabinets
- How to Rotate Your Display Items Throughout the Year
For more expert solutions, arrange a free consultation with your preferred acrylic provider or design team.