Seal an Acrylic Keychain A 2026 Guide
You want to create a durable, professional-looking diy acrylic key chain. A central question then arises: must you seal an acrylic keychain? While sealing protects your design, it is not always required. This tutorial and our other tutorials explore popular methods, including uv resin. We will help you choose the best approach for your acrylic keychain project.
Should You Seal Your Acrylic Keychain?
Deciding whether to seal an acrylic keychain depends on your goals. Sealing offers great protection, but it also adds time and cost to your project. High-quality permanent vinyl is quite durable on its own. Let's look at when sealing is a good idea and when you might not need it.
When Sealing is Recommended
You should seal your keychain for maximum durability and a professional, glossy finish. Sealing is highly recommended if the keychain will face heavy use.
Consider how you will use the keychain.
Everyday Users: Keys that get tossed in a bag or pocket are exposed to scratches and spills.
Outdoor Enthusiasts: Keychains on hiking packs face sun, dirt, and moisture.
A sealant protects your design from these elements. Without protection, sunlight and weather can cause serious damage to the vinyl. UV light breaks down the material, leading to problems like:
Color Fading: Sunlight makes vibrant colors look dull and washed-out.
Cracking: The vinyl can become brittle and develop tiny cracks.
Peeling Graphics: Heat and sun can weaken the adhesive, causing the vinyl edges to lift.
If you want your design to last for years, it is best to seal an acrylic keychain.
When You Might Skip Sealing
You might skip sealing for a keychain that will have light use. For example, a decorative charm on a backpack may not need a sealant. A high-quality permanent vinyl can often handle this without issues. You might also skip this step if you are on a tight budget or timeline.
However, you must be careful if you choose to seal vinyl. You need to let the vinyl "breathe" or "gas out" before sealing it.
Important Note: Manufacturers suggest waiting at least 24 hours after applying vinyl before you seal it. The vinyl releases solvents as it cures. If you seal vinyl too early, these trapped solvents can soften the material and weaken the adhesive, causing it to peel or curl later.
This waiting period is a key reason some creators choose not to seal their diy acrylic key chain. For a simple acrylic keychain project, the risk might outweigh the reward if you are in a hurry.
Sealing Methods: Resin vs. Sprays
You have two main choices for sealing your keychain: resin or sprays. Each method offers a different level of protection, finish, and effort. Your choice will depend on the durability you need and the final look you want to achieve.
Using UV Resin or Epoxy (Permanent Seal)
Resin provides the most durable, professional, and permanent seal. It creates a hard, glass-like layer that offers excellent resistance to scratches and water. You will find two common types: UV resin and two-part epoxy.
UV Resin: This is a single-part liquid that hardens very quickly (in minutes) when exposed to a UV light. Its fast cure time and high clarity make it extremely popular for craft projects like keychains.
Two-Part Epoxy: This type requires you to mix a resin and a hardener. The chemical reaction causes it to cure over a longer period, often 24 hours or more. It is incredibly strong but requires more patience.
Pro Tip: For most keychain projects, uv resin is the preferred choice over two-part epoxy. Its fast curing time and ease of use make it perfect for small-batch crafting.
Using Sealant Sprays (Less Permanent)
Sealant sprays are a faster and more budget-friendly option. These sprays, often found in aerosol cans, are easy to apply and dry quickly. They provide a good layer of protection against moisture and minor wear. However, this seal is less durable than resin and may not withstand heavy use or harsh conditions. Sprays create a much thinner coat, preserving the flat feel of the keychain.
Here is a quick comparison to help you decide:
Feature | Resin (UV or Epoxy) | Sealant Spray |
|---|---|---|
Durability | Excellent. Forms a hard, impact-resistant layer. | Good. Protects from light wear but can scratch. |
Finish | Thick, high-gloss, domed appearance. | Thin, clear coat with a semi-gloss finish. |
Application | More steps. Requires careful application and curing. | Very easy. Just spray in thin, even coats. |
Ultimately, the best way to seal an acrylic keychain depends on your project's needs. Resin offers maximum protection, while sprays offer speed and simplicity.
How to Seal an Acrylic Keychain with UV Resin
Using uv resin is the most popular way to get a glossy, domed finish on your keychains. This method creates a durable, professional-looking product that protects your design. The following step-by-step instructions will guide you through the process. This tutorial is one of many helpful tutorials available for crafters.
Step 1: Gather Materials and Prepare
Proper preparation is the key to a flawless finish. You must work in a clean, dust-free, and well-ventilated area. Before you begin, gather all your materials so they are within reach.
⚠️ Safety First! UV resin releases fumes that can be harmful. You must protect yourself. Always wear the proper safety gear when working with resin.
Here is what you will need for this part of the project:
Safety Equipment: Your health is the top priority.
Nitrile Gloves: These gloves resist chemicals better than latex.
Respirator Mask: Use a mask with organic vapor cartridges to protect your lungs from fumes.
Safety Goggles: Protect your eyes from accidental splashes.
Project Supplies:
Your acrylic keychain with the vinyl design already applied (and cured for 24+ hours).
A bottle of high-quality uv resin.
A silicone mat to protect your work surface.
A UV lamp for curing.
A small heat gun or a lighter for removing bubbles.
Toothpicks or a silicone tool for spreading resin.
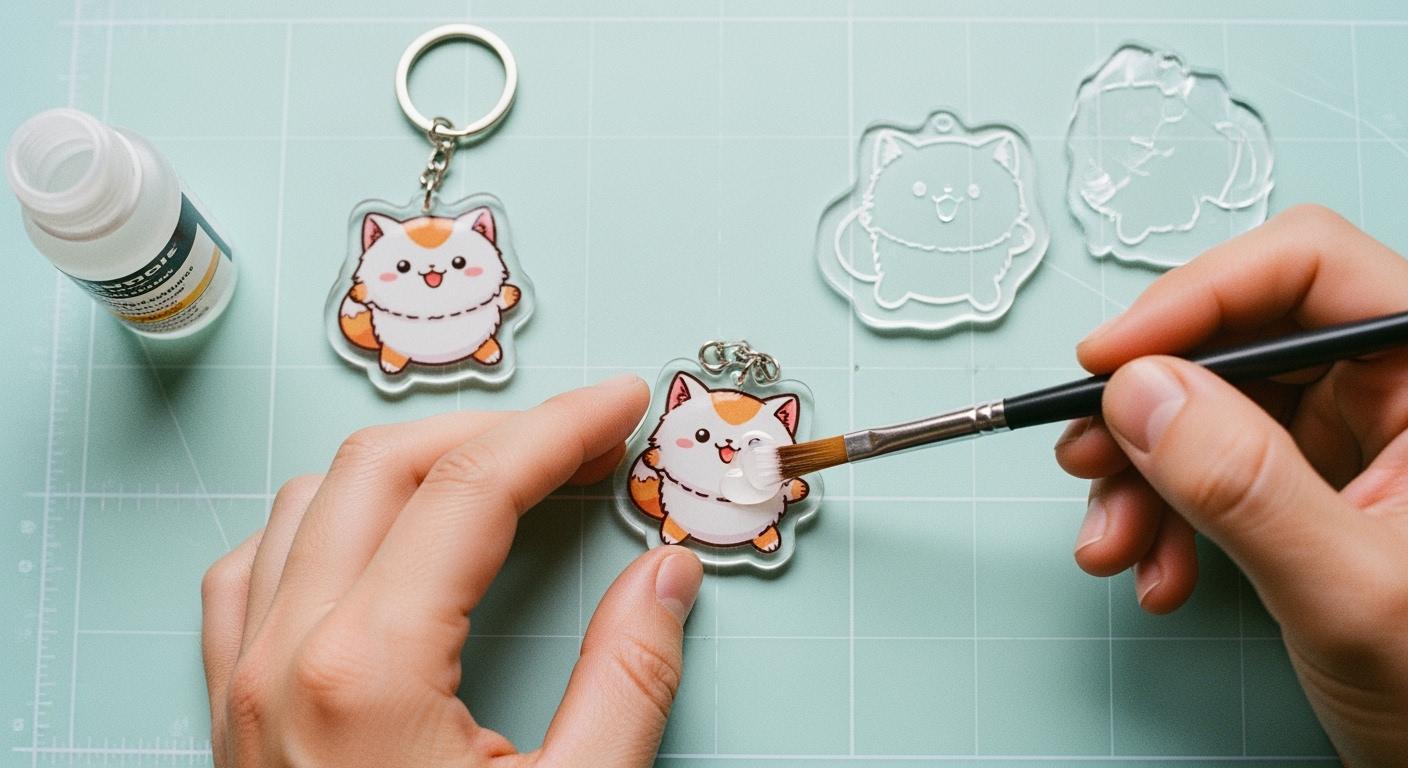
Step 2: Apply the UV Resin
You are now ready to apply the resin. Place your keychain on the silicone mat. Make sure it is lying perfectly flat.
Start by squeezing a small amount of resin directly onto the center of your keychain. Use the nozzle of the bottle to gently guide the resin toward the edges. You can also use a toothpick or a silicone tool for more control. The goal is to create an even layer that covers the entire surface. The resin will self-level, but you can help it along. Add more resin as needed, but do it slowly to avoid overflow. For a beautiful domed effect, carefully build the resin up to the edge without letting it spill over the side.
Step 3: Remove Bubbles
Air bubbles are a common issue, but you can easily remove them. After applying the resin, let the keychain sit for a minute. Some bubbles will rise to the surface and pop on their own.
For the remaining bubbles, a heat gun is your best tool.
Hold the heat gun several inches away from the keychain's surface.
Keep the gun moving in a constant, sweeping motion. Do not hold it in one spot for too long.
The heat breaks the surface tension of the resin, allowing the trapped air to escape.
This quick process will leave you with a crystal-clear finish. If you see a stubborn bubble, you can also use a toothpick to gently pop it. This part of the tutorial is crucial for a professional look, and many tutorials emphasize this step.
Step 4: Cure the Resin
The final step is to harden, or "cure," the resin. This is where the magic happens. Carefully place your keychain under your UV lamp.
The power of your lamp determines the curing time. Most keychain projects cure well with a UV lamp between 9 and 36 watts. Many crafters find that standard LED nail lamps work perfectly for this. Follow the instructions on your resin bottle, but a general guideline is:
Cure the resin for 1-3 minutes under the UV lamp.
After the first cycle, gently touch the side of the keychain (not the top) to check for tackiness. If it feels sticky, place it back under the lamp for another 60 seconds. Once fully cured, the surface will be hard, smooth, and no longer sticky. Your efforts to seal an acrylic keychain are now complete, and your diy acrylic key chain is protected. This tutorial, like other tutorials, aims to make the process simple. We hope our tutorials help you succeed.
Troubleshooting and Final Touches
Even with careful work, you might face a few small issues. Do not worry. Most problems are easy to fix. This section will guide you through common fixes and the final assembly of your project.
Fixing Common Resin Issues
A common concern with uv resin is yellowing over time. This happens due to environmental factors, not just the quality of your work. You can prevent this with the right materials and care.
Pro Tip: Always choose a high-quality resin labeled as "UV-resistant" or "non-yellowing" for the best results.
Here are the main causes of yellowing and how you can prevent them:
Cause of Yellowing | Prevention Method |
|---|---|
UV Exposure | Store finished keychains away from direct sunlight. |
Heat Exposure | Avoid leaving your project in hot places, like a car. |
Poor Quality Resin | Use a reputable, high-quality, non-yellowing resin. |
Oxidation | Keep your resin bottles tightly sealed and stored in a cool, dark place. |
Re-drilling the Keychain Hole
Sometimes, resin can accidentally fill the keychain hole. You can easily fix this with a small drill.
You should use a small, sharp drill bit. A 1/32-inch bit is a great starting point.
A hand drill (also called a pin vise) gives you excellent control for this small task. A Dremel tool also works well.
Drill slowly to clear the cured resin from the hole. The goal is to create an opening large enough for your jump ring to move freely.
Assembling Your DIY Acrylic Key Chain
You have reached the final step. You are now ready to assemble your diy acrylic key chain. This is where your project transforms into a finished product. You will need a few pieces of hardware.
Jump Ring: Use pliers to gently twist open a jump ring. Do not pull it apart. Slide the open ring through the hole in your acrylic keychain.
Keychain Ring: While the jump ring is open, slide the main keychain ring onto it.
Secure: Use your pliers to twist the jump ring closed. Make sure the ends meet perfectly so it does not snag.
With these final touches, your diy acrylic key chain is complete. You have successfully created a personalized stylish key holder ready for use or to be given as a gift.
You have learned the best ways to seal an acrylic keychain. Your choice depends on your project's needs. Use UV resin for a durable, glass-like finish. Choose sealant sprays for a faster, simpler option. A properly sealed keychain protects your design and gives it a professional, polished look. Your custom creation is now ready to be shown off or sold! 🎉
FAQ
Can you seal both sides of an acrylic keychain?
Yes, you can seal both sides for complete protection. You should seal one side first. Cure it completely under the UV lamp. Then, you can flip the keychain over and repeat the process on the other side. Many tutorials recommend this for items receiving heavy use.
Why is my cured resin still sticky?
A sticky surface often means the resin is under-cured. You can fix this easily. Place the keychain back under the UV lamp for another 1-2 minutes. If it remains sticky, your lamp might be too weak. Some tutorials suggest wiping it with isopropyl alcohol.
What is the best UV lamp to use?
You do not need an expensive lamp. A standard LED nail lamp with 9 to 36 watts works perfectly for keychain projects. This tutorial and other online tutorials show that these lamps cure resin effectively. You can find them easily online or in beauty supply stores.
Can you use other sealants besides resin or spray?
Yes, you have other options. Some crafters use decoupage glue like Mod Podge. You apply it in thin layers. It provides a simple, water-based seal. However, it is not as durable as resin. This specific tutorial focuses on resin, but other tutorials explore different methods.