How to Design a Creative Army Retirement Shadow Box: Step-by-Step Ideas & Pro Tips
Honoring a lifetime of service deserves more than a simple token—it calls for a legacy, beautifully preserved. An Army retirement shadow box does just that: turning military milestones, medals, and memories into a compelling, personalized display. This guide will empower you not only to create a display worthy of a hero, but also ensure it truly tells their unique story—using the latest preservation and design best practices.
Why Create an Army Retirement Shadow Box?
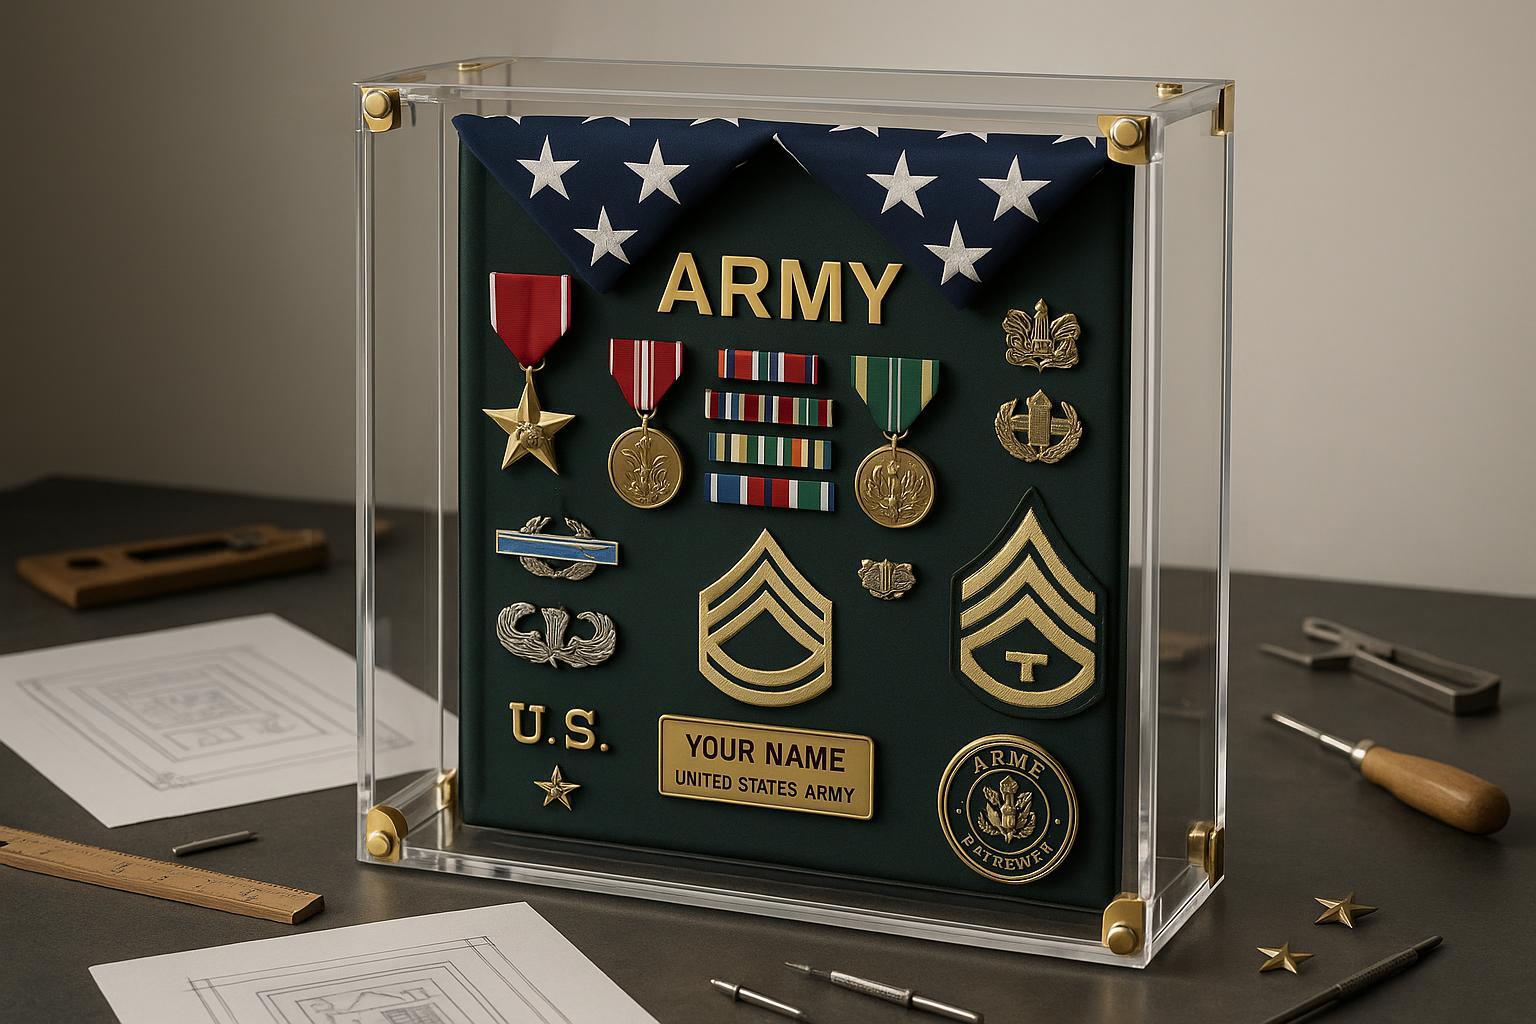
Celebration of Service: It encapsulates decades of dedication in the U.S. Army—medals, ribbons, badges, insignia, patches, and personal keepsakes.
Storytelling: Each object’s place in the box tells part of the retiree’s journey and honors their accomplishments.
Preservation: The right design protects precious memorabilia from dust, UV damage, and the passage of time for years to come.
Step-by-Step: Designing a Show-Stopping Army Retirement Shadow Box
1. Inventory Your Memorabilia
Estimated Time: 30 minutes
Gather all candidate items: medals, ribbons, unit insignias, badges, rank pins, certificates, patches, coins, photos, personal mementos, and a folded flag.
Carefully clean every piece with a soft, dry cloth—do not use water or chemicals on fabric items.
Pro Tip: Ask the retiree or family if they have any “must-include” keepsakes or humorous inside-joke items that add personality.
Checklist: Medals | Badges | Rank Insignia | Ribbons | Patches | Unit Coins | Photos | Certificates | Flag | Unique Mementos
2. Find Creative Inspiration & Choose a Theme
Estimated Time: 15–30 minutes
Chronological Journey: Arrange items to map key assignments or promotions.
Medal of Honor: Put highest honors front and center, with supporting badges surrounding them.
Personal Touch: Add handwritten notes, favorite quotes, or mission patches that share a story behind the service.
Branch Flair: Use Army colors, regimental emblems, or a custom background reflecting unit pride.
Download: Free Shadow Box Layout Planner (PDF)
3. Select the Optimal Display Case Material (and Why Acrylic Shines)
Key Comparison:
Material | Durability | Weight | UV/Dust Protection | Clarity | Modern Upgrades |
|---|---|---|---|---|---|
Wood/Glass | Heavy, fragile | High | Moderate | Good | Traditional only |
Acrylic | 10+ years, shatterproof | Low | Superior (with seals) | Excellent | Lighting, engravings, custom dividers |
Acrylic: Modern, museum-quality, and highly protective. Prevents yellowing, blocks dust/UV, lighter and much safer than glass. Allows for creative layouts (compartmentalization, lighting, etc.). More on acrylic advantages ↗
TOYIN Custom Acrylic Display Boxes: For a truly professional result, consider a tailored solution from Toyin Acrylic Products Co., Ltd. (TOYIN). TOYIN’s boxes are precision-cut, eco-friendly, and can be customized with integrated lighting, engraved nameplates, and perfect-fit compartments for every memorabilia type.
Fact: Acrylic cases, properly sealed, offer superior protection for over a decade, with no yellowing or dust ingress.
4. Plan Your Layout (Design Before You Mount!)
Estimated Time: 20–30 minutes
Lay all items on a flat, clean surface and experiment with arrangements. Avoid crowding—less is usually more impactful.
Mock up several designs: group by theme, timeline, or significance. Get family/friend feedback for clarity.
Use a ruler or free printable grid template for balance.
Pro Tip: Snap a photo of your favorite arrangement before you start fixing anything down!
5. Gather Your Assembly Supplies and Prep the Box
You’ll Need:
Acid-free pins, archival adhesives (double-sided archival tape or glue), or Velcro dots (for heavier items)
Archival backing (fabric, foam, or paper)
Gloves (for handling medals/documents), ruler, soft brush, silica gel packs (for moisture control), labeling supplies
Optional: Background fabric/paper, engraved nameplate, mini-LED lighting
6. Securely Mount Items for Long-Term Protection
Estimated Time: 20–45 minutes depending on item count
Paper/Mounted Medals: Use archival photo corners or acid-free adhesive, never glue directly to important items.
Fabric & Patch Items: Pin or sew through backing fabric to avoid damage.
Heavy or Odd-Shaped Items: Use Velcro strips, internal supports, or ask about fitted acrylic compartments.
For fragile/valuable items, create secondary sleeves/pockets before mounting.
Always wear gloves and only touch surfaces if necessary.
Troubleshooting if Adhesion Fails: Try an alternative mounting method or contact a display specialist (TOYIN offers design support for difficult items).
7. Personalize, Enhance, and Seal the Display Case
Add captions: labels, calligraphy, or a small framed story
Optional: Install mini-LED strips (run wiring discreetly through acrylic compartments)
Place a US flag (tri-folded) as a focal point if desired
Double-check dust and UV sealing, clean the box inside and out, add silica gel packs, and close securely
Creative Touches:
Background with unit insignia, map, or team photos
3D layering with internal risers or compartments
Integrated lighting for gallery effect
Troubleshooting & FAQs: Avoiding Common Pitfalls
• Overcrowding?
Pull back! Remove items until you achieve a balanced, uncluttered look. Larger displays or splitting items by theme may work better.
• Items won’t stay put?
Test adhesives on a fabric sample first. For medals, use acid-free pins; for heavier pieces, add hidden supports or consult a professional.
• Worried about Fading or Yellowing?
Place finished case out of direct sun, and use only UV-protected acrylic for unbeatable results (see expert comparison).
• Found Dust Inside After Assembly?
Carefully open, dust with a soft brush (no chemicals), then re-seal. Double-check all gaskets/sealant edges if using an acrylic box.
• DIY Fear Factor?
Order your box pre-designed/custom-assembled from TOYIN or another specialist—professional results and item safety are guaranteed.
Downloadable & Printable Resources
More Creative Army Shadow Box Ideas & Inspiration
Use colored or textured backers for visual pop
Arrange medals in patterns—stairs, circle, or timeline
Mix in personal artifacts: dog tags, coins, challenge medals
Use engraved acrylic nameplates for a professional touch
Add integrated cordage or fasteners to showcase larger objects (helmets, tools)
For more project ideas, see Lone Star Challenge Coins’ Inspiration Gallery.
Why Choose a Custom Acrylic Box from TOYIN?
Perfect Fit & Museum-Quality: Precision-tailored to your memorabilia—no wasted space, no crowding
Advanced Features: Built-in compartments, risers, internal LED lighting, laser engraving, and protective coatings
Archival Safety: Strict quality control, acid-free materials, eco-friendly and ISO certified (Learn about TOYIN’s capabilities)
Global Delivery & Fast Quotes: Order from anywhere, get expert advice—ideal for families & veterans worldwide
Ready to create a professional, lasting display? View TOYIN's Army Shadow Box Gallery or Get a Quick Quote Now!
References & Featured Resources
Step-by-Step Guide to a Custom Shadow Box (Shadowbox Display Case)
Official Army Shadow Box Assembly Tips (The Soldier’s Project)
Creative Military Shadow Box Ideas (Lone Star Challenge Coins)
Preserving Collections in Shadow Boxes (Shadowbox Display Case)
Craft your legacy with care. Create an Army retirement shadow box that will inspire, honor, and protect—now and for generations to come.