Don't just brief a manufacturer; get exactly what you want

You have a vision for a perfect custom food display. Turning that idea into a real product can be challenging. Costly mistakes often happen during the design process. A detailed brief is your single most critical tool for success. It ensures you brief a manufacturer with total clarity.
Note: This process guarantees you get the exact custom display you need. Your product will look great in its new food display.
How to Brief a Manufacturer

You must provide clear instructions when you brief a manufacturer. A great brief removes guesswork. It helps the manufacturer build the exact custom display you envision. These tips will help you create a perfect brief for your retail needs.
Detail Product Specifications
First, detail the product you will display. The type of food determines the design and materials. For example, bakeries need a different display than a shop selling cold drinks. Your product details ensure food quality and safety.
- Temperature: Does your product need heating or cooling? Heated displays keep food between 140°F and 160°F. Refrigerated cases hold items from 33°F to 41°F. Specify this to ensure product quality.
- Weight and Size: List the dimensions and weight of each product. This information dictates shelf strength and spacing for optimal visibility.
Providing these details helps the manufacturer recommend the best custom solutions for your specific product.
Define Location and Environment
Next, describe where the display will live. The retail environment impacts the materials and design. A display near a sunny window has different needs than one in a dark corner.
Note: Consider accessibility in your retail space. ADA rules require clear pathways. At least 50% of your shelves must be within reach for all customers. This ensures a positive customer experience.
Also, think about humidity and light. A display in a humid area needs proper sealing to prevent moisture damage. A custom display in direct sunlight requires special screens to avoid glare. High-quality materials are essential for durability in any retail setting.
Clarify Business Goals
Finally, explain what you want the display to achieve. Your custom display is a powerful marketing tool. Do you want to boost sales for a specific product? Do you need to improve brand visibility? Clear goals lead to a better design. For instance, pop displays near a register can increase impulse buys. A well-designed pop display creates an engaging shopping journey. Your goals help the manufacturer create a high-quality retail fixture that delivers results.
Design Your Custom Display
You need to turn your idea into a clear plan. Visual aids are essential for this custom display design process. Even a simple hand-drawn sketch with measurements is better than words alone. For a professional approach, provide Computer-Aided Design (CAD) drawings. These drawings show the exact layout and dimensions, which removes any guesswork for the manufacturer. For your branding, you must provide vector files for logos and specific color codes (like Pantone or CMYK). This step guarantees your brand’s look remains consistent and professional on the final product.
Provide Overall Dimensions
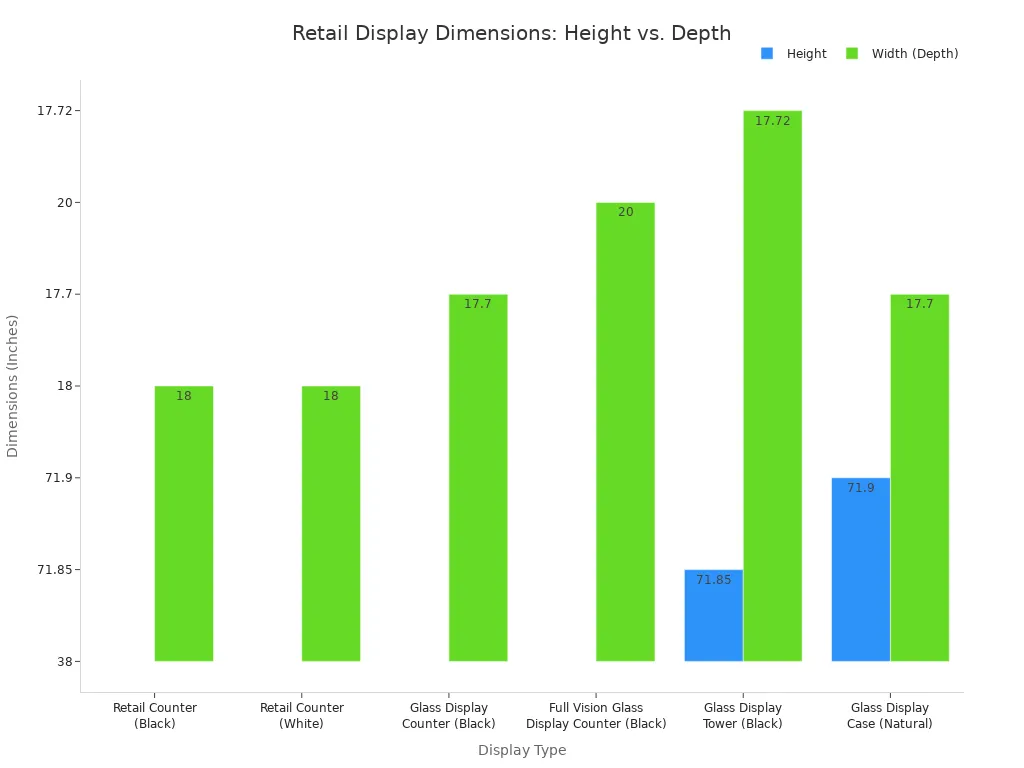
You must specify the exact size of your retail display. The dimensions depend on its placement. Countertop displays are smaller, while floor-standing units can be much taller. The right size ensures your display fits perfectly in your retail space and offers great product visibility.
Detail Structural Features
Think about the functional parts of your custom display. Features like adjustable shelves or magnetic dividers offer great personalization. These custom solutions allow you to change the layout for different product sizes. This flexibility is a key part of a quality retail display design that improves the customer experience. This level of personalization ensures your display remains useful for a long time.
Plan for Custom Display Boxes
Your plan should include custom display boxes. When you design custom display boxes, you create a home for your product. There are many types of custom display boxes to consider. These boxes protect your product inside the main display. Good custom display boxes improve your marketing. Here are some tips to customize custom display boxes: personalize your design to match your branding. The quality of your custom display boxes reflects the quality of your product. These boxes are essential. The types of custom display boxes you choose matter.
Design Custom Retail Display Cases
For valuable or delicate items, you need to design custom retail display cases. These custom display cases offer security and a premium look. Adding features like doors or locks to custom retail display cases increases cost but also adds protection. For high-value goods, your custom retail display cases should have advanced security. Consider reinforced locks and shatter-resistant acrylic for your custom retail display cases. These custom display cases can even integrate with store alarms. A quality pop display for bakeries might need custom-sized acrylic display cases. Good custom retail display cases are an investment. These custom display cases protect your retail inventory. The design of these custom retail display cases is critical.
Specify Materials and Durability
Choosing the right materials is crucial for your custom display. The material affects the display's appearance, lifespan, and safety. Your choices will ensure the final product is both beautiful and built to last for your retail environment. A quality display starts with quality materials.
Choose Acrylic Type and Thickness
You have options when it comes to acrylic. The two main types are cast and extruded acrylic.
- Cast Acrylic: This is a higher quality acrylic. It offers superior durability and is great for a premium finish, but it costs more.
- Extruded Acrylic: This is a more budget-friendly, quality option. It is ideal if you need a large number of displays for your retail stores.
The thickness of the acrylic depends on what you plan to display. For very light items, 3mm acrylic is often enough. For heavier products like books or electronics, you should specify at least 10mm thick acrylic. High-end custom retail display cases may even use acrylic up to 1" thick for extra strength and a premium feel. The right acrylic ensures good product visibility.
Confirm Food-Safe Materials
For any food display, safety is your top priority. You must use the correct materials for your custom display cases and custom-sized acrylic display cases.
Important Tip: Any surface that has direct contact with unpackaged food must be made from food-grade materials. Specify that you require FDA-compliant acrylic or other certified materials like PET-G.
Using the right materials prevents contamination and ensures you meet health standards. This is a non-negotiable part of a quality food display design. The quality of your materials for your boxes is also important. These tips will help you create quality boxes. Your retail product deserves quality boxes. These boxes are a key part of your display. The quality of these boxes matters.
Detail Hardware and Assembly
The hardware holds your display together. You must specify the load capacity requirements for each shelf. Tell the manufacturer the maximum weight the shelves need to support. For example, a quality shelf for heavy items like bottled drinks or large pastries should hold at least 15kg. This detail ensures your retail display is safe and durable. Also, clarify if the display will be shipped fully assembled or flat-packed. If it is flat-packed, request clear assembly instructions. The quality of the hardware for your boxes is just as important as the boxes themselves.
Outline Budget and Logistics
You must clearly communicate your budget and logistical needs. This information helps the manufacturer provide an accurate quote and timeline. A good plan prevents surprises and keeps your project on track for your retail stores.
State Quantity and Budget
You need to state your order quantity. Manufacturers have a Minimum Order Quantity (MOQ). This is the smallest order they will accept. MOQs vary widely. Some companies have an MOQ of 50 units, while others may require 500. Always ask about price breaks for larger orders. Buying in bulk often lowers the per-unit cost of your custom display. This is a great way to get more value. A quality manufacturer will offer tiered discounts for your retail needs.
Establish Project Timelines
You should set a clear project timeline. A typical prototyping stage for a retail display takes about 7 to 15 days. It is smart to plan for extra time. Delays can happen with shipping or if you need design changes. A realistic timeline ensures you receive your quality acrylic display on schedule. This planning helps you manage your retail launch without stress.
Define Shipping and Packaging
You must define your shipping and packaging requirements. The right packaging protects your acrylic display during transit. Your retail investment deserves quality protection. Here are some essential packaging tips:
- Surface Protection: Use protective films to cover all acrylic surfaces. This prevents scratches on your quality display.
- Cushioning: Wrap each acrylic item in bubble wrap. Place the items in sturdy, double-walled cardboard boxes.
- Secure Placement: Use foam inserts or packing peanuts to fill empty spaces inside the boxes. This stops the items from moving. These boxes must be strong.
- Labeling: Clearly label all boxes as "Fragile." This tells handlers to be careful with your retail shipment.
Your choice of packaging materials affects the total project cost. Standardized boxes can reduce expenses. Using quality boxes ensures your products arrive safely. These boxes are vital for protecting your acrylic goods. The right boxes make all the difference. Your retail success depends on these final details.
Access Your Briefing Template
You are now ready to create a brief that gets results. We created a comprehensive template to simplify this process for you. This tool ensures you cover every critical detail for your project. Your manufacturer will receive a clear and complete guide.
A Checklist for Success
Think of this template as your project's ultimate checklist. It organizes all the information a manufacturer needs. You will find sections for product specifications, environmental factors, and business goals. The template also guides you through material choices for your display. It even includes prompts for detailing custom boxes. Using this checklist prevents costly misunderstandings. It helps you get the exact display you want. The template covers requirements for all types of boxes.
How to Use the Template
Using the template is simple. Follow these steps to build a perfect brief for your custom display. This process ensures you remember all the details for your boxes.
- Download the file. Save a copy to your computer.
- Fill in each section. Provide as much detail as possible.
- Attach your visual aids. Include sketches, CAD files, and brand assets.
- Review your brief. Check for clarity and completeness before sending.
This structured approach helps you communicate your vision for the display and its protective boxes. The template ensures your requirements for all boxes are clear. These boxes are an important part of the final product. Your custom boxes will be perfect. The template helps you specify the right boxes.
Download Your Free Brief
Take the first step toward your perfect custom display. Download our free briefing template today. It is the best tool to turn your vision into a reality. You can confidently manage your next project. You will get the quality display and boxes you need.
Ready to start? 🚀
Click here to download your FREE Custom Display Briefing Template!
This template helps you define the right boxes for your products.
A detailed brief is your blueprint for success. You can confidently brief a manufacturer for your custom retail display. This process removes guesswork for your retail display design. Taking time to detail your custom retail display saves you money. Your retail display and retail boxes will be perfect. Your custom retail display needs the right retail boxes. The template helps you define the perfect display and boxes.
Take control of your project! 🚀
Download the template to brief a manufacturer for your next retail display. Get the exact retail display and custom boxes you need for your retail display.
FAQ
What if I cannot make a professional drawing?
You do not need a professional drawing. A simple hand sketch with clear measurements works well. Your main goal is to show the manufacturer your vision. This includes the layout for your products and any custom boxes you need.
Why are food-safe materials so important?
You must protect your customers. Food-safe materials prevent harmful chemicals from touching the food. This rule applies to the display surfaces and any internal boxes. Using the right materials keeps your retail business compliant with health codes.
How can I protect my display during shipping?
You should request strong packaging. Use protective film on all surfaces. Wrap items in bubble wrap and place them in sturdy cardboard boxes. Fill empty spaces inside the boxes to stop movement. These boxes protect your retail investment. Good boxes are essential.